fbpx

Many people considering starting a one person business know the daunting task that is ahead of them, but they believe the risk is worth the reward. How do you get your business off the ground, and how do you attract the big clients you need to grow?

Showing your prospective customers that you can deliver on your promises with your one person business is critical, especially if you’re trying to justify premium fees or prices for your services. When it’s just you, working in a one man business from your home, this can be challenging. The good news is that there are tricks you can use to make your business seem bigger than it is and polish your professional image.

Starting a One Person Business – The Essentials

No matter if you plan to add employees or work entirely by yourself, the following essentials can help you get your business off the ground.

1. Choose the Right Business Form

In a single person business, the IRS will treat you as a sole proprietorship. Choosing a different business form can make your one man business eligible for valuable tax and legal advantages. For example, many people find registering their business as a limited liability corporation (LLC) is the right choice. Steer clear of these pitfalls while setting up your LLC as a freelancer.

Hiring registered agents to increase your privacy and handle legal and financial affairs can ensure compliance with regulations by keeping your personal information off the public record

Registering as an LLC protects your personal assets from being a liability if anyone were to bring a claim against your business or sue you. You can claim business losses and profits on your personal tax returns each year. This gets rid of a lot of the paperwork involved in registering a traditional corporation. There are different benefits according to the state where you form an LLC. Make sure your state comes under the best state to register an LLC.

2. Write Your Business Plan

Just because you’re starting a one person business doesn’t mean you can do it without creating a business plan. It’s critically important that you set up a business plan that outlines your goals and how you’ll reach them to save money and time. A business plan can also help you see potential problems and take steps to fix them before they turn into enormous headaches.

You can also use the business planner apps which serves as a valuable tool for streamlining your workflow, enabling you to optimize and enhance your operational processes.

3. Create Your Business’s Website

Your website is your business’s face. Essentially, it helps you present the best professional image possible to any potential clients. If you want to give the illusion that your business is more extensive than it is, this website can help.

For example, it’s easy to put contact information for different departments like accounting, sales, and customer service. These different department contact options give anyone who looks at your website the impression that you have several employees. In turn, this can build confidence in your capabilities.

4. Set Up a Bank Account For Your Business

Although there’s only one of you, you must keep your personal and business finances separate. This separation will save you a lot of hassle at tax time, and mixing the two can even get you in legal trouble.

Open a separate business bank account, checking account, and get at least one business-only credit card. It’ll save you from problems with the IRS, and it makes record-keeping much more manageable.

5. Start Managing Your Time Effectively

There are 24 hours in a day and one of you, so make the most of each hour you work. Break down all of your business goals into small steps to help you make steady progress. Figure out when you’re most energetic throughout the day. Are you a night owl or a morning person? Depending on your answer, this is when you want to schedule your most important tasks because you’re at peak performance levels during this time.

6. Take Advantage of Technology

Take advantage of the dozens of pieces of technology that can help your business run smoothly. For example, uploading all of your critical business documents into cloud storage allows you to access them anywhere you see fit. Software like Billdu can help you track your expenses, accept payments, generate invoices, and much more.

Depending on your single person business, you could even set up an app. If you walk dogs for a living, let customers book your services on their phones. An app adds a layer of convenience to your business that can draw new customers to you.

Starting a One Person Business with

7. Consider Hiring Help

Yes, your end goal is to be a one person business. But sometimes, help is required. There are two types of duties you can consider delegating. The first type is the low-value tasks relevant to the time they take, like sorting email, scanning documents and organizing them, or scheduling meetings. The second type is things you don’t excel at like bookkeeping, managing your SEO, or designing a logo.

If you decide to get outside help and delegate tasks, decide how much you’ll pay. To do this, you’ll have to know how much your time is actually worth. Say you’re starting a virtual assistant business that bills $100 per hour. It’s worth your time to enlist someone to do your bookkeeping and pay them $20 an hour because that gives you more time to work on billable tasks.

Tricks to Make Your One Man Business Appear Bigger and Look Professional

Looking professional and bigger than they really are present significant challenges for small businesses. However, there are simple tricks you can use to start building confidence with your customers from the first time they stumble on your website.

1. Update Your Logo

If you have an existing logo, take a good look at it. Is it compelling, accurate, and an attractive showcase for your business? Sometimes, a few minor tweaks to your typography, brand colors, or composition is everything you need to refresh and update it. If you don’t have a logo design, it’s time to create one.

People who are still deciding on investing their resources and time into a logo, remember that this part of your business is so much more than a website or business card. You can’t send out generic invoices in Excel or Word if you want to look professional. Every form you send out to your business associates and customers should bear your logo because it helps establish trust.

2. Have Professional Billing

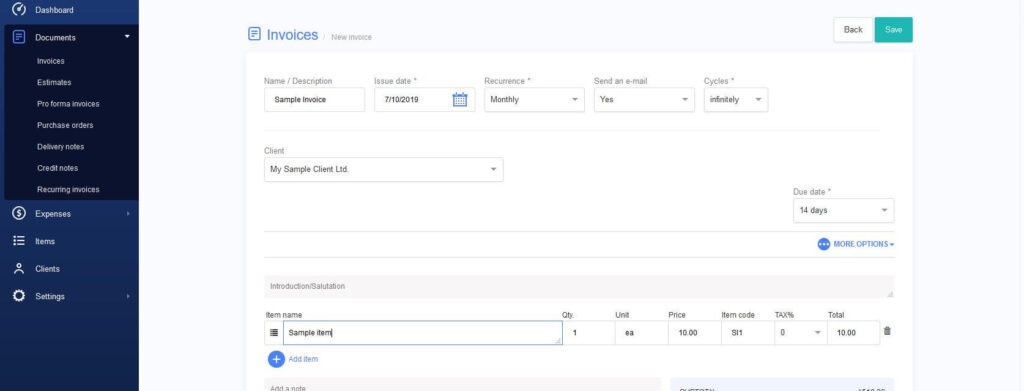
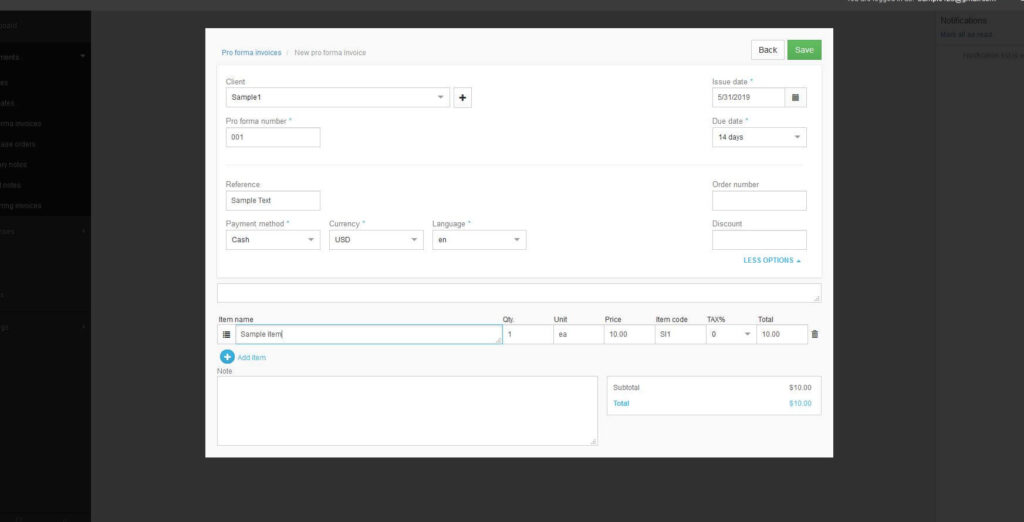
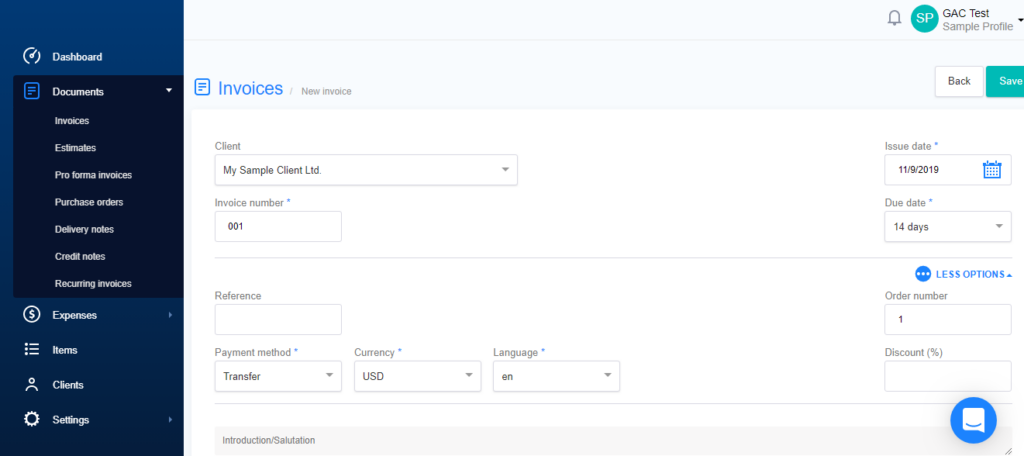
Your one person business should bill like a professional business. Billdu allows you to send out professional bills in single and recurring transactions. Once you create your account, look to the left side of your dashboard. If you click on “Documents,” you’ll be able to create and send out estimates, invoices, purchase orders, delivery notes, and more.
Track your One Person Business Invoces

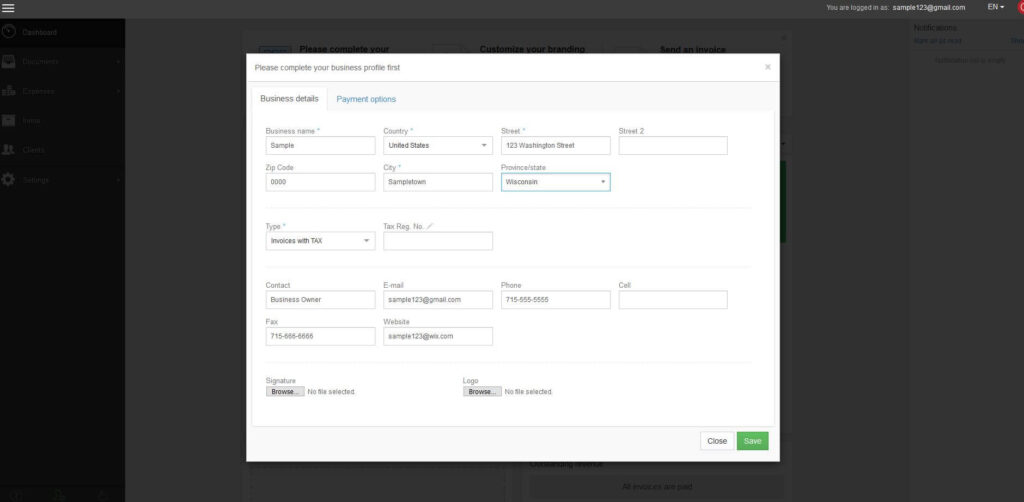
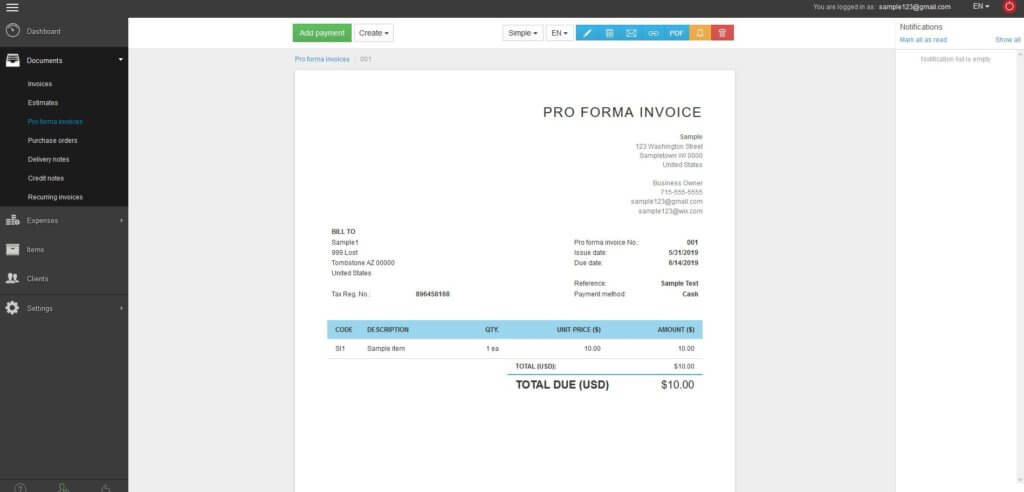
Insert your information, and Billdu will generate a professional invoice. If you have a logo, you can insert it and save it, so it automatically shows up on every correspondence you send out.
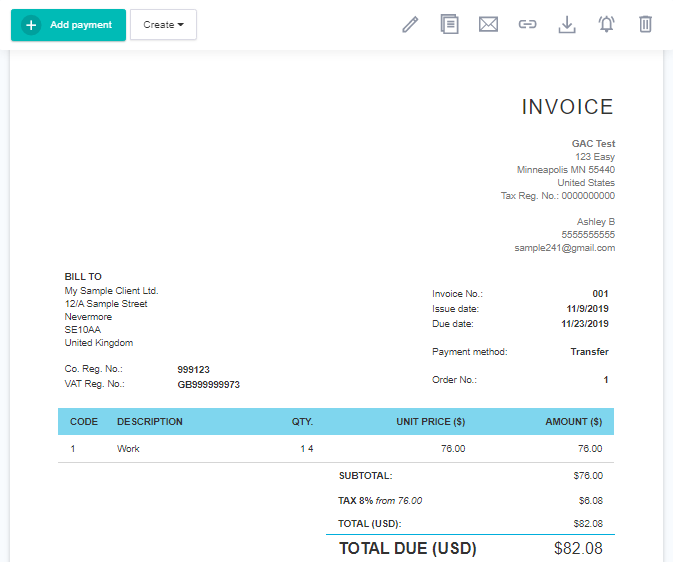
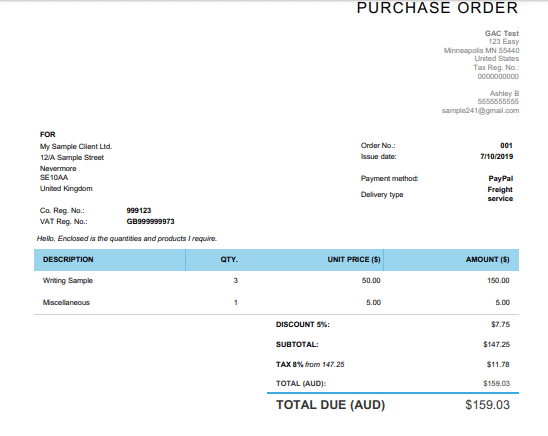
Professional Invoices for Startup of one Person Business

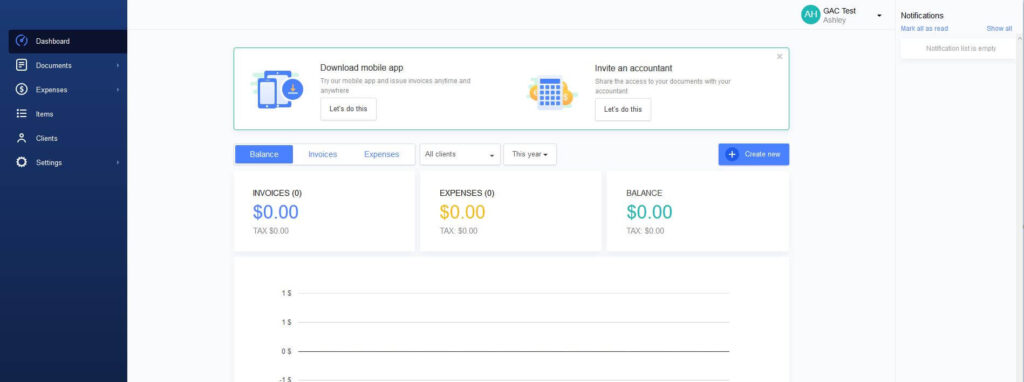
You can set Billdu up to automatically share it with your accountant or an app. The dashboard keeps track of all of your invoices and expenses, so you can tell exactly what they are at a glance. Once your customer pays you, you can update the invoice accordingly.

3. Embrace Social Media

Some of the first places customers go to see how credible a one man business is are social media channels like Facebook, Twitter, or LinkedIn. You want to create, manage, and update content for all of these channels along with filling in your business information. Since this can be time-consuming, focus on one or two at first.

If you’re offering a professional service, focus on engaging and updating industry groups and then you can schedule LinkedIn posts. For companies selling beauty products or fashion accessories, embrace Instagram, and striking visual content. Include links to your business in your platform profiles.

A larger follower base can bring your business more sales and popularity. Boost your business by considering the possibility of purchasing followers on LinkedIn.

4. Collect and Showcase Testimonials and Reviews

Good reviews and recommendations are instrumental in helping any new business grow. However, happy customers are busy with their own lives, and they may need a small nudge to leave you feedback.

One surefire way to get compelling endorsements is by capturing video testimonials of satisfied customers, which can be effectively achieved using dedicated platforms. Simply send them a link to the recording app and they’re good to go.

The goal is to make it as easy as possible for them to leave reviews and recommendations on your business listing or social media page. Check-in with them through email with a quick link to the review area. At the very least, make it a point to collect phone numbers and names of happy customers who are willing to vouch for your business if needed.

One Person Business Ideas

There are hundreds of ventures and niches you can use to start your new one person business. You want to love what you do, so doing research and founding a company that aligns with your goals and likes is critical. A few one person business ideas include:

1. Virtual Assistant 

With technological advances, it’s easy to do secretarial work from the comfort of your home. Virtual assistants are more economical for businesses to hire than on-site, full-time employees. You can book travel, perform receptionist duties, and handle everything your customers may need from your home office. Depending on the industry and your experience levels, you can earn between $20 an hour up to $100 an hour.

2. Pet Sitting or Dog Walking 

If you have a love for animals, pet sitting or dog walking is an excellent one person business venture. When people are at work or on vacation, you can take care of their pets. Make sure you get your pet CPR certification and pet first aid certification so people know they can trust you with their pets. Dog walkers charge around $20 per hour, but it depends on your location. Pet sitting is typically about $30 per day.

3. Consulting or Freelance Work 

If you excel in one particular area, you can use your knowledge to work as a consultant or a freelancer. Many businesses can’t or don’t want to commit to full-time employees for copywriting, social media management, or web design and development. If you have past experience in these areas, you can sell them your knowledge. What you charge depends on your speciality, but freelancers who excel in their niche can make a great living.

If you want to know what the consulting invoice template looks like for the services provided, read the following article.

4. Residential Cleaning Services 

Cleaning other people’s homes or businesses can be lucrative. Many people are willing to pay hundreds of dollars for a clean house. It’s hard work, but your startup costs are relatively low. As you start to take on more and more clients, you can hire new cleaners to help expand your company. You’ll need the right equipment like a vacuum and a host of cleaning supplies, but you won’t need to invest in office space.

5. Food Trucks

Food trucks have exploded in popularity in recent years. Many of them drive around and sell things like ice cream, souped-up grilled cheese, speciality sandwiches, and comfort foods. If you love to cook and share your food, investing in a food truck is a great way to start your one person business.

6. eCommerce Shop

It’s extremely easy to start your own eCommerce shop today. You don’t even have to be able to code your website. There are platforms that do it for you. You can sell knick-knacks, crafts, t-shirts, or jewellery. Dropshipping is another one person business idea where you don’t even have to have the items on-hand to sell them.

And when you use an inventory management automation solution like the one found at Sparkshipping, you’ll barely have to worry about order processing or routing. Automation software can turn an already easy-to-manage business into a hands-off company, giving you more time to focus on marketing and customer service. 
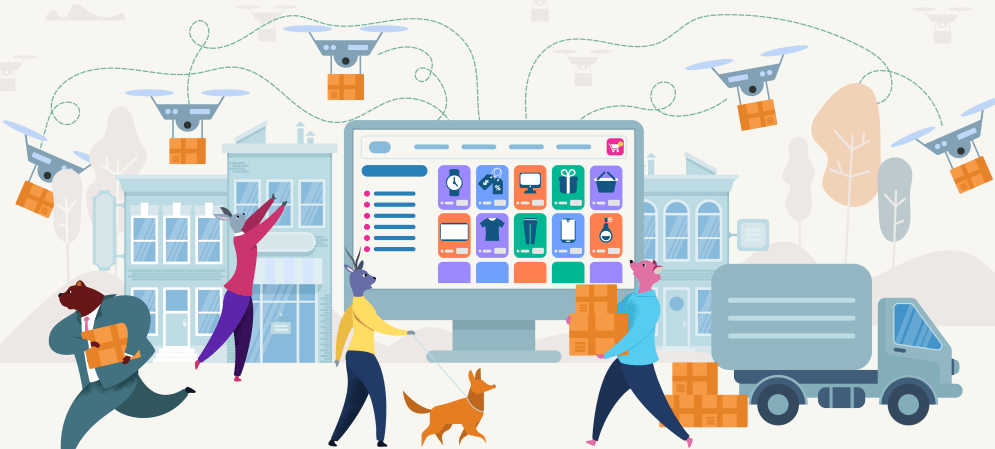
Running a Successful Business of One eCommerce shop

7.  Tutor

Tutoring people is an excellent way to make a good amount of money from your home office. Most websites require you take and pass a knowledge test before you can tutor anyone. Once you do, you get so much per hour tutoring on subjects you know and understand. You can tutor around your schedule at any time that makes sense for you. Furthermore, ensure that your home office is a space where you feel comfortable and productive.

Register for a Free Trial with Billdu Today!

When you’re starting a one person business, you must start on the right foot. Billdu can help with our innovative software. We’ll help you track your expenses, create professional invoices, and give you access to your documents from your phone with our app.
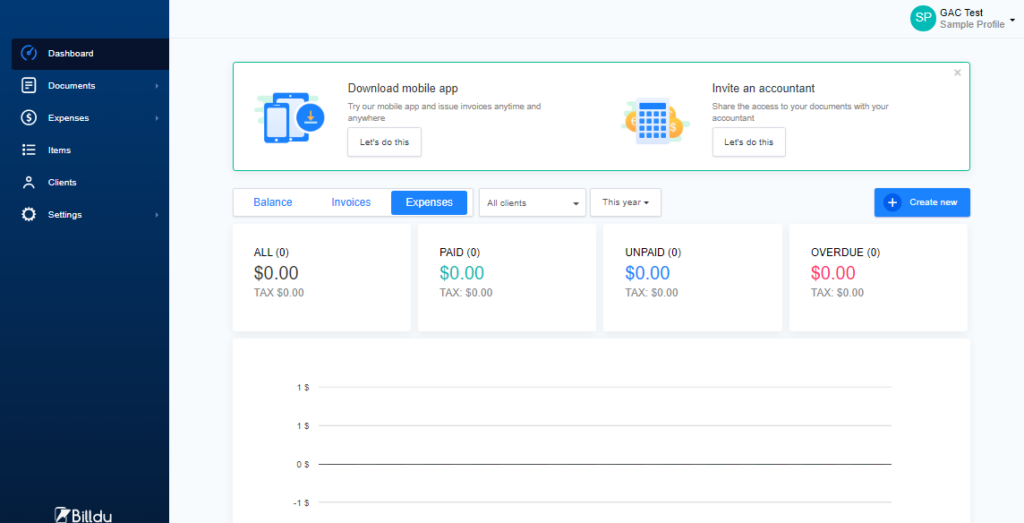
Start running a successful business with Billdu

Try Billdu today to start creating professional invoices and tracking your business expenses via our user-friendly online dashboard and mobile apps. You can register for a free trial below.

Start for free

Looking for Downloadable Invoice Templates?

We have them ready for you, select your format and get your invoice template now

There are many challenges when you start your small business and begin managing it daily. How do you strike the balance everyday between incoming and outgoing cash flow? Many small business owners have money concerns at the top of their list.

The good news is, there are many ways you can give your business a positive financial overhaul and improve your finances. They don’t have to be large-scale changes to be effective, either. The following tips and software ideas represent practical small business money management tips you can adopt right now.

Why Having Solid Finances for Small Businesses is so Important

Small business money management is the process where you handle the daily finances associated with your business through setting goals, creating a budget, tracking income and expenses, and investing. If you have a solid plan in place for your small business, you can avoid having negative cash flow.

Another essential reason to keep an eye on your finances for small businesses is to ensure you stay on track to turn a healthy profit. You’ll avoid common money problems like making late payments, not collecting your accounts receivable, and falling short with money for your expenses. Additionally, it helps you locate and keep funds that keep your business afloat in slow seasons or months.

12 Small Business Money Management Tips

To keep your business running smoothly, you need enough money coming in to cover your business’s expenses. Put these tips to use to learn how to effectively manage your small business’s money effectively.

1 – Before Your Sign, Negotiate with Your Vendors

Sometimes, you have to work to get a good bargain. When you make purchases from specific vendors or contract suppliers, don’t sign the contract right away. See if they’re open to negotiating a lower price. Also, remember to take a good look at the purchase terms like grace periods and penalties for paying late. In some circumstances, getting an extra 30 days to pay is better than a 5% discount upfront.

2 – Don’t Mix Your Personal and Business Expenses

Second of our money management tips – for a good reason! There are dozens of reasons why you want to keep your business and personal accounts separate like personal liability, tax issues, and mixed up accounting records. If things get tight with your business finances, don’t use your own funding to secure your business finances. Doing this can lead to a mess you’ll pay for later.

The easiest way to keep these expenses separate is to create a budget. Use this budget for your personal funds and to create a budget for your business. Follow them and ensure that business loans or credit cards don’t end up on your personal expense budget and vice versa. You’ll make your accountant happy that they don’t have to try and untangle your finances.

Dont Mix Your Personal and Business Expenses Finances for small business

3 – Be Frugal

While you don’t have to obsess over coupons to save money on your everyday business expenses, frugality is a must. If you get mail-in rebates, follow through and send them in. Buy your equipment and furniture secondhand or rent it. Go green and install LED lighting to help cut down on your utility costs.

4 – Don’t Make Late Payments

Just like your personal finances, you want to pay all of your business bills on or before the due date. Loan payment and credit card fees can add up very fast, but so does paying constant late fees on vendor bills. The same line of thinking goes for your taxes, but taxes have much more severe monetary penalties.

Set up monthly reminders for all of your bills to ensure nothing slips through the cracks. You’ll have a skinny profit-loss margin when you first start. Avoiding multiple late fees could mean the difference between ending the year in the black or red.

5 – Take an Accounting Class

Just because you have a small business doesn’t automatically make you fantastic with money, but you have substantial financial decisions on your plate. Even if you hire an accountant or bookkeeper, you want to understand business accounting basics. Take an Introduction to Accounting course either in-person at your local community college or online. Learn how cash flows in and out of your business.
The more you know and learn about small business money management, the better you’ll prepare yourself to make smart money decisions. No matter how large or small your financial challenges are, nothing can replace being hands-on and proactive.

6 – Monitor Your Spending

Do you know how much you spend with your business every day? How about every week or month? If you don’t carefully monitor your spending, you could end up with bills you don’t need or can’t afford. Overspending can lead to massive issues like the misuse of funds.

It’s common for business owners to have several business-related accounts like a credit card account, savings account, and checking account. Monitor all of them to see how much you withdraw from each one. This monitoring will help you to keep on top of your account balances.

It’s deceptively easy to use your business checks, debit card, or credit card to cover several small expenses. A new coffee machine here or lunch for the staff there, it all adds up relatively quickly. If you don’t keep tabs on your spending, you could end up with a hefty bill or an overdrawn account with fees.

7 – Don’t Neglect Your Accounts Receivable

If you have credit options for your customers, you’re aware that you may not get the money owed for services or products until the due date or after it. After a week or month goes by, it’s easy to neglect your accounts receivable. Remember the money customers owe you and pursue payment from them.

To help you keep your accounts receivable in the front of your mind, record them. Send out regular invoices and late notices to customers, and keep doing it until they pay you. If you need the money sooner than the due date, offer an early payment discount.

8 – Time Every Purchase

You want to avoid instances where you have low cash flow, and timing your purchases can help. Resist the urge to make unnecessary purchases until you pay all of your bills for the month. Also, wait until you have enough cash in your accounts to cover any new expenses that may come up.

Timing your purchases can decrease your business’s tax liability, as well! Before the end of the year, it’s a good idea to consider stocking up on tax-deductible items like business supplies. You can claim these on your tax return and reduce the amount you owe.

9 – Create and Stick to a Budget

Sit down and put in some time creating a budget, and plan to keep up with it. This can significantly simplify the way you manage your business’s finances. A budget will help you set clear revenue and expense goals.

The budget will outline the expenses you incur while operating your business. When you know exactly how much you can spend, it’s easier to manage your spending habits. A budget can also forecast your future business revenue. If you see that your revenue forecast is lower than you budgeted for, start looking for ways to cut expenses and increase your income.

Track your Business budget

10 – Manage Your Inventory

Do you have a habit of ordering too much inventory that sits and collects dust in your stock room? Or, are you on the other end of the spectrum, and you’re always running out of in-demand products that cause you to turn away customers? Improving how you manage your inventory can help you balance your small business’s finances.

Start tracking how much inventory you have and avoid going over the fine line between not having enough and having too much. Record your inventory sales and purchases in your software and take time to monitor how much you have in stock before you order more.

11 – Cut Your Costs and Increase Your Revenue

These two small business money management tips are relatively straightforward, but people struggle with increasing their income while decreasing their expenses. If you’re having trouble finding the balance every day, make it a point to find ways to cut your costs and increase your revenue.

Do you know how to control business expenses? To cut your costs, find and take a hard look at your expenses. When you get an idea of your spending areas and how much you spend, you can start cutting out frills. Shopping for new vendors can also cut costs.

You can work on increasing your business’s revenue by promoting your products through email marketing, offering discounts, adding new products, or setting up a referral or loyalty program to gain and keep your customers.

12 – Set Aside a Cash Reserve

While putting small business money management tips into everyday practice can dramatically improve your cash flow management processes, having a cash reserve is a good idea. The unexpected can happen, and you don’t want to scramble for funds to cover an emergency.

To start your cash reserve, open a business savings account. Make a point to regularly deposit money into the account, and don’t dip into it unless you have no other choice. This will help you in a pinch, and it can give you peace of mind.

How to Set Up and Track Expenses with Billdu

Billdu lets small business owners manage their finances by helping them set up and track their expenses. You can monitor your payment schedules, cash flow, invoices, expenses, and more all in one dashboard. Our step-by-step guide will tell you how to get started and use Billdu to your most significant advantage.

Step One – Create an Account

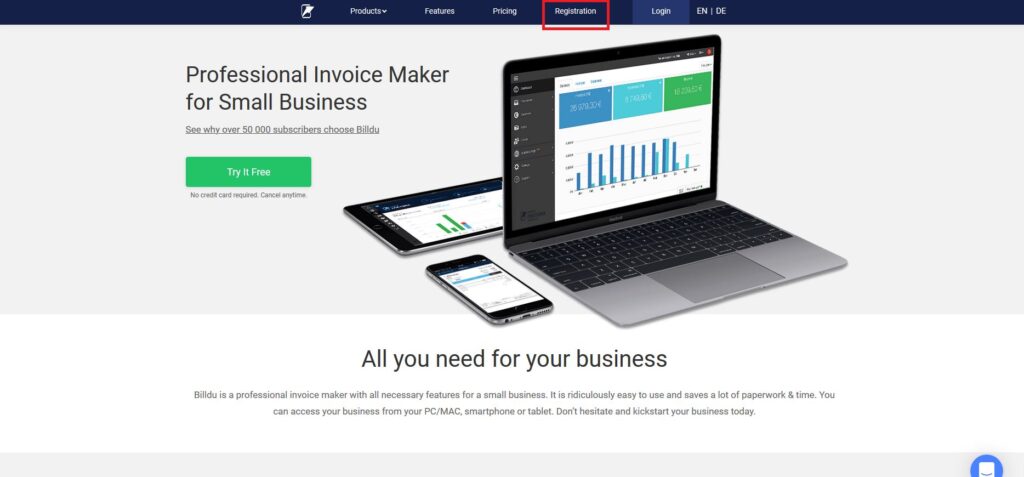
The first step you take is to go to Billdu.com and create an account. Click on the “Registration” button located on the top of the screen. A new tab will open that prompts you to fill in your information and create your account.

Step One Create a Account

Step Two – Fill in Your Personal Information

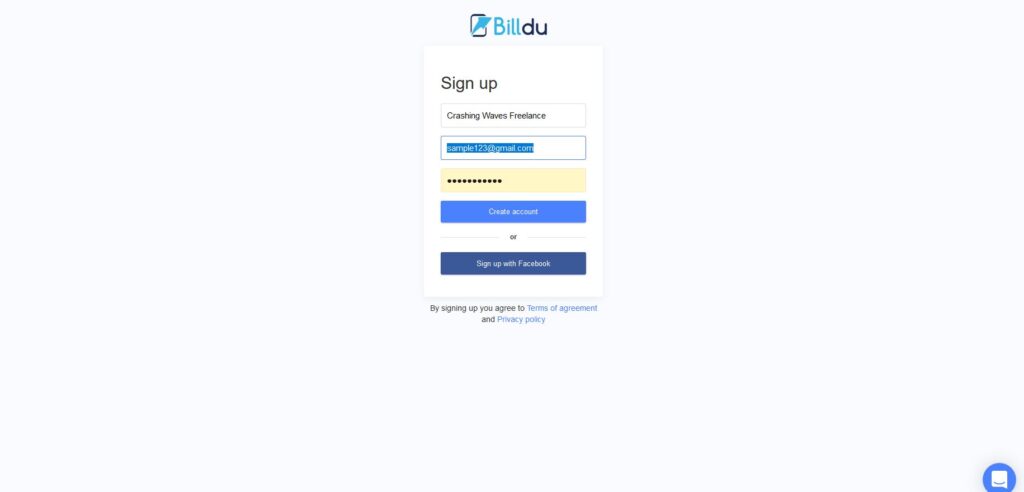
When the new tab opens, you’ll fill in your business name, email, and password. Once you get everything in these fields, click on the “Create Account” button.

Step Two Fill in Your Personal Information

Step Three –  Your Dashboard

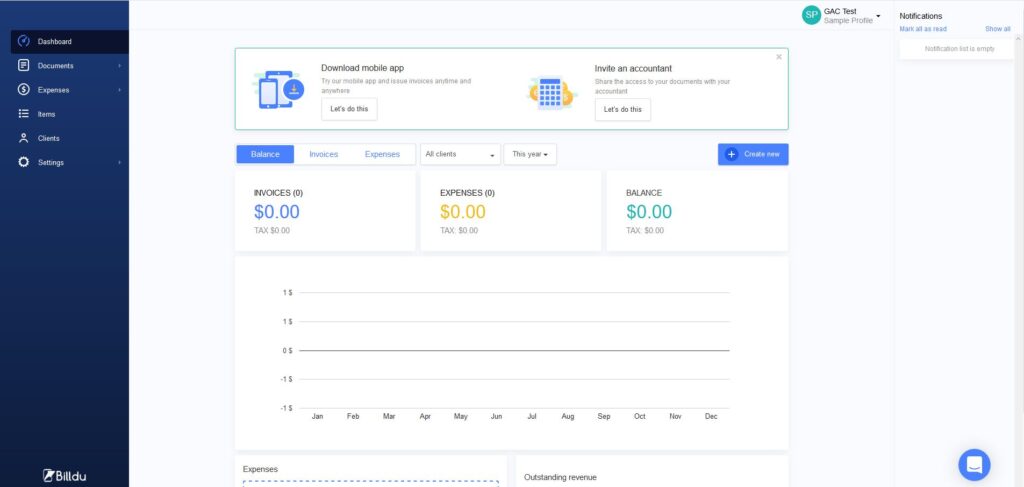
Billdu will send you a link to validate your email. Go to your email, find the link, click where it tells you to, and it’ll bring you back to your dashboard. Once you get here, take a little time and explore it to see what options you have available to you.

Step Three Your Dashboard

Step Four – Find Your Expenses Tab

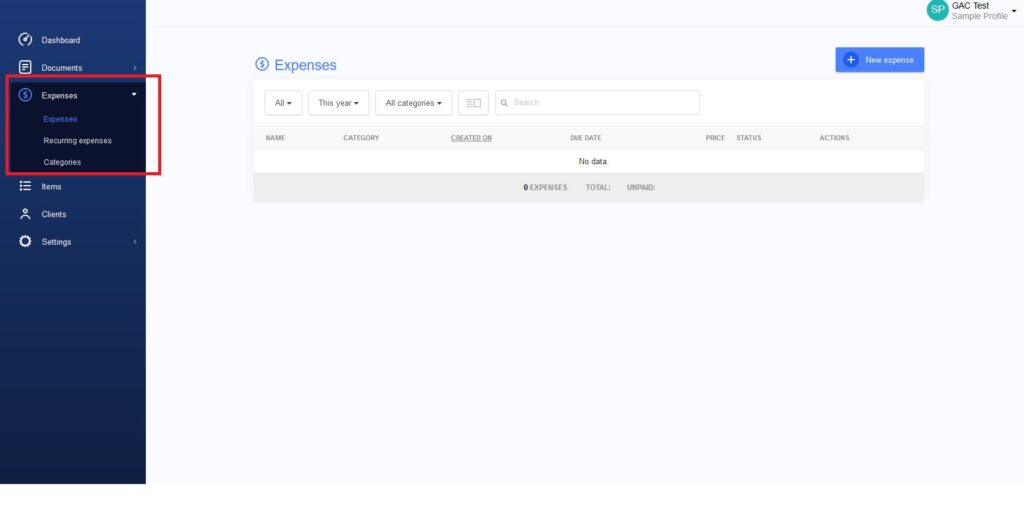
If you look to the left side of your dashboard, you’ll see an “Expenses” button with a small white arrow next to it. Click it to open a cascading menu. Clicking here will bring you to your expense dashboard, where you can see one-time and recurring expenses.

Step Four Find Your Expenses Tab Monitor everyday balance

Step Five – Set Up Your Expenses

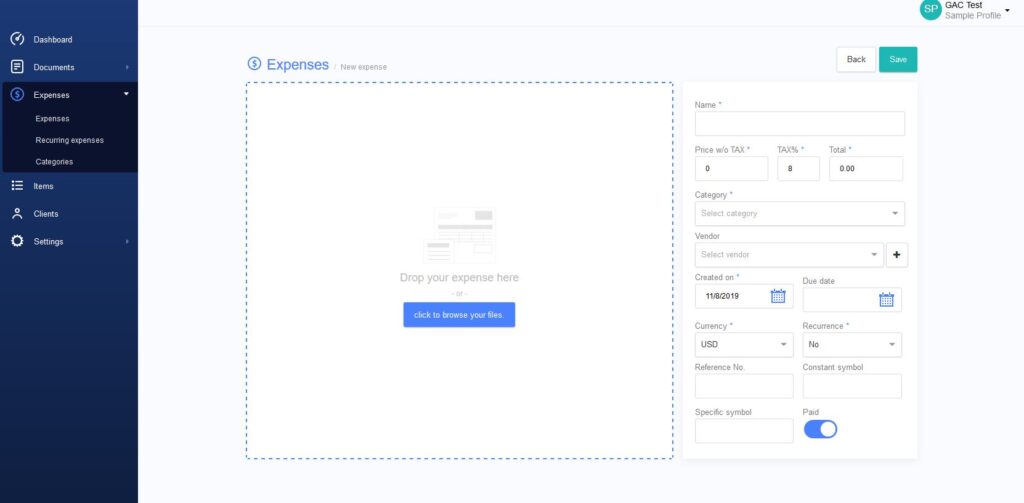
If you look to the right, you’ll see a blue button with a + sign that says, “New expenses.” Click on it. A new expense form will open that you can fill in to help you track everything. You can fill them in manually or drag and drop documents to auto-populate the fields.

Step Five Set Up Your Expenses

Step Six – Fill in Your Expense Information and Save It

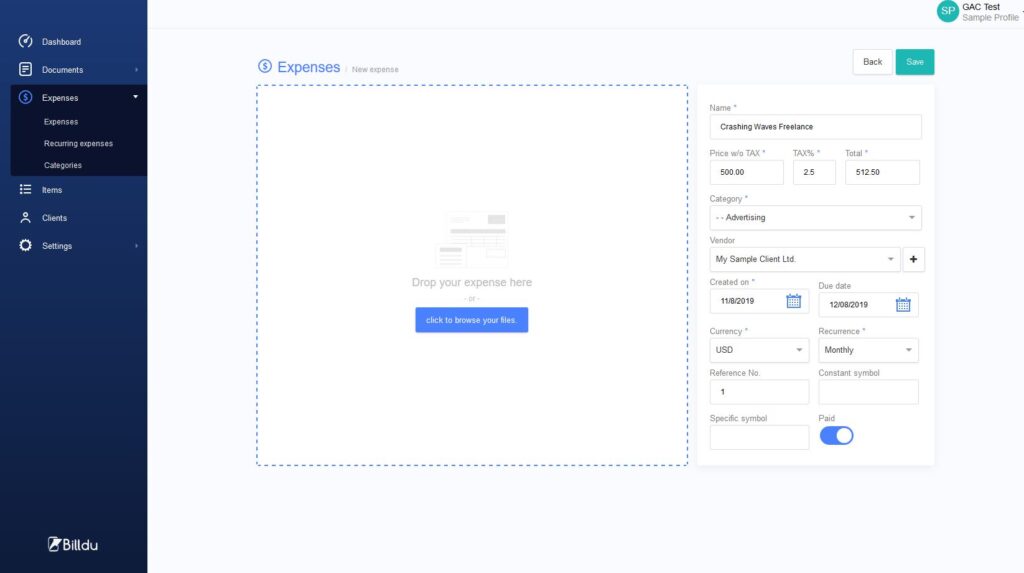
The next step is to fill in the expense information for a one-time expense. You want to fill in the name, price without tax, tax amount, vendor, created, due date, currency, whether or not it’s recurring, reference number, and a symbol if it has one.

Step Six Fill in Your Expense Information and Save It

Step Seven – Monitor Your Expenses and Recurring Expenses

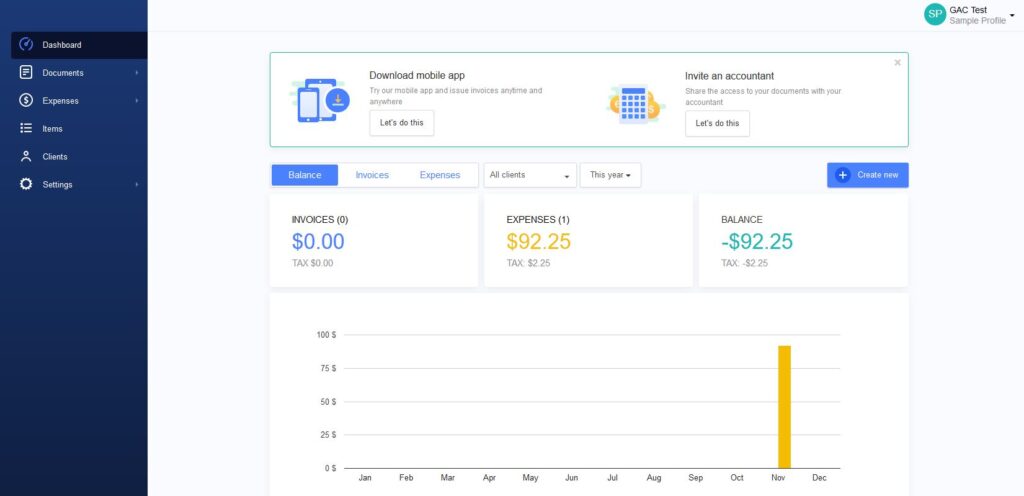
You’ll create your expenses as you need them for your business. We set Billdu up so it’s easy to keep your one-time and recurring expenses separate. If you go to your dashboard, you’ll be able to tell at a glance what your costs are.

Step Seven Monitor Your Expenses and Recurring Expenses

Register for a Free Trial with Billdu Today!

If you need comprehensive small business money management, use Billdu. You can sign up for your free trial and see how easy it is to use today!

Start tracking your business money with Billdu

Try Billdu today to start creating professional invoices and tracking your expenses via our user-friendly online dashboard and mobile apps. You can register for a free trial below.

Start for free

Looking for Downloadable Invoice Templates?

We have them ready for you, select your format and get your invoice template now

Contractors and many self-employed people give job estimates to potential clients to detail their prices. This helps the client decide whether or not they can afford the workers’ rate for the project they have in mind. But what is an estimate, and how do you write one? We’ll outline all of this information for you and more below.

What is a Job Estimate?

Before you know what goes into an estimate, you have to know what it is. An estimate is an educated, rough guess of what a job may cost. You typically give estimates before you know all of the details involved in a specific project. An example would be during an initial call with a new prospective customer or during a quick site visit.

Job estimates are your first thoughts on the potential costs, and they can drastically change when you get complete information. Unexpected complications can come up during the work that are outside the scope of what the customer initially asked, and this can cause cost increases.

Key Piece of Information – An estimate is only an informal idea of cost based on minimal information. It’s a starting point that can rise or fall. Clients cannot use estimates as a legal price standpoint.

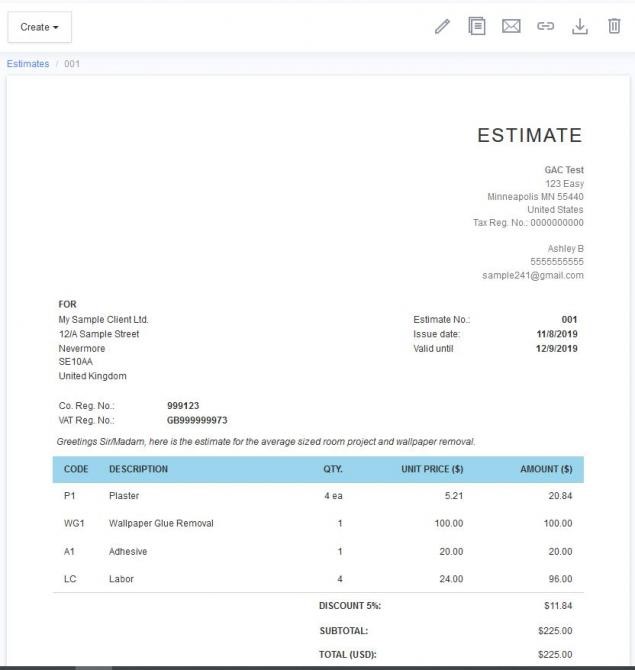
For example, let’s say a client asked you to plaster what they said was an average-sized bedroom. When the prospective client calls you, they don’t have the exact room measurements. They mention that the room has some older wallpaper you’d have to remove before you do anything else. You’d send an estimate that showed your starting costs, say $200 for the room and $50 for the wallpaper removal.

NEVER label your estimate a quote until you have all of the information you need because quotes are legally binding.

Is a Written Estimate a Quote?

No. A quote is an exact price you’ll charge for completing the job. It’s fixed, and you can’t change it once the customer accepts it. The only exception is if the customer changes the type or amount of work required or you find out the job is totally outside of the original scope you agreed on and wrote your quote for.

You’ll only issue your customer a quote after you complete a thorough onsite visit when you have confidence that you established precisely what the job entails.

Key Piece of Information – You present your quotes formally, and the quote represents a contract between the customer and your business. If a price dispute comes up, the customer has a legal standpoint.

In the previous example involving the estimate for the “average-sized” room, you’d take a visit to your customer’s home. You find that the bedroom is significantly larger than average, and the walls have layers of old wallpaper that will take longer to remove.

Your quote would consider this, and you’d send one that showed it would cost you $225 to plaster the room with $100 for extensive wallpaper removal. So, a quote is an exact price and legally binding, and an estimate is not.

Tip: To enhance your sales workflow, explore top quoting apps designed for small businesses.

Tips for Writing a Work Estimate

Price may play a significant role in winning a job estimate, but it’s not an automatic guarantee that the client will pick you. Customers will usually be happy to pay more for peace of mind or quality work. If it’s the first time you’re working with a customer, you have to convince them you’re the correct choice. This is where a professional job estimate comes in, and we’ll give you tips to write one.

Use a Professional Template

Your written estimate should have a professional template you use to impress your potential clients. It should be a direct reflection of the image you want to display. Take the time to customize your work estimate template to include your brand colors, logo, and industry accreditation logos in the header. These things will show potential clients you’re interested, serious, and the real deal.

Be Quick When You Issue an Estimate

Time is money, and you want to be quick when someone requests an estimate. Sending them online is usually the most professional and fastest way to get it done. Once you meet with the client, go back to the office and write out your estimate. You can send it to their inbox in mere minutes, and beat your competition.

Make it Extremely Clear

You don’t want any confusion at all with your estimate. Itemize everything required for the job. Price out and list each production step or part separately. This high level of transparency breeds trust and tips the hand more favorably in your direction. It’s also vital that your written estimate lays out your payment terms. Use simple wording to get your point across, and make sure to discuss it further when you first meet with the client to go over the estimate itself.

Put a Deposit Request on the Estimate

As a self-employed or small business owner, one of the smartest moves you can make is to ask your clients for a deposit upfront. This deposit can help pay for out of pocket job expenses, reduce your risk of having unpaid invoices, improve your cash flow, and help you start the job sooner. You can vary your deposit amount depending on the scope and size of the project.

Make Payment Easy

The nature of your written estimate gives you the chance to open the lines of communication regarding how your payments work before you even start a project. You don’t want to risk losing out on the project because you don’t have payment plans that suit your customer.

Show that you can be flexible and offer all or most modern ways people expect to pay. With Billdu, you can set up a broad range of payment options, and you can even accept payments right from the app or online.

Give More Reasons to Say Yes, and Fewer to Say No

No matter how competitive you may keep your pricing, there will always be one or two customers who aren’t ready to commit to your pricing scale. Being able to offer financing helps reduce the project cost’s sting because your customer gets monthly payment options. It also makes it easier for customers to commit to bigger projects. It’s a good idea to offer financing early in the project discussions, and many people choose to have it right on the written estimate.

How to Create a Professional Job Estimate with Billdu

Billdu offers the chance for people to create professional work estimates and track each one. This tracking capability helps small business owners monitor their cash flow, payment schedule, estimates, invoices, and more. We’ll give you a step-by-step guide on how to start with Billdu and how to write an estimate next.

Step One – Create an Account

The first step you take is to go to Billdu.com and click on the “Registration” button on the top of the screen. Clicking this button will open a new tab where you fill in your information and create your account.

Create an account to start creating job estimates

Step Two – Fill in Your Information

A new tab will open and ask you to fill in your business name, email, and password. Fill in those fields and click on the “Create Account” button.

Billdu App Login screen

Step Three – Explore Your Dashboard

Billdu will send you a link to validate your chosen email. Go to your email, find the link, click where it tells you to, and it’ll bring you back to your dashboard. Once you get here, take a little time and explore it to see what options you have available to you.

Dashboard with overview of your activity

Step Four – Find Your Estimate Area

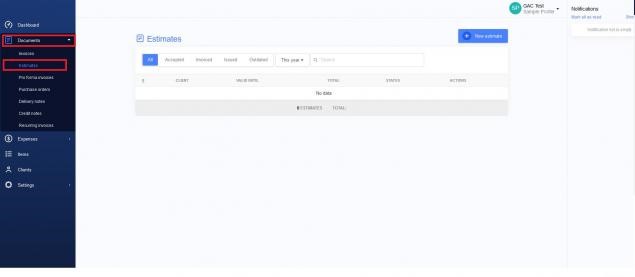
The way Billdu’s dashboard works is that there are menus on the left side of your screen that you can click. When you click the menus that have a little arrow by them, they open and cascade downward. To get to the job estimate area of your dash, click on “Documents” first, and then click on the “Estimates” button.

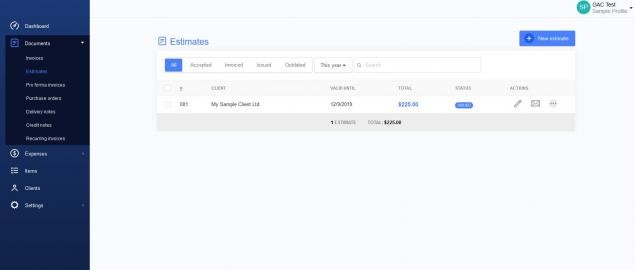
This part of your dash will show you your accepted, invoiced, issued, and outdated estimates. You can also filter by date or search for individual estimates.

Finding the estimates section on your dashboard

Step Five – Open Your New Estimate – Fill in Client Information

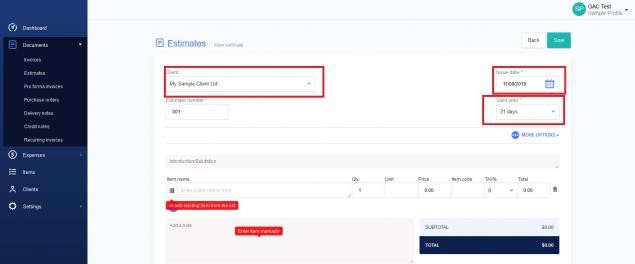
If you look on the right, you’ll see a blue square with a + sign and “New estimate.” Click this box to open your new estimate template. The first thing you’ll do is fill in the top half of the estimate with your client’s information. Put in the client name, issue date, and how many days the estimate is valid for.

Start creating a new work estimate

Step Six – Fill in Your Payment Information

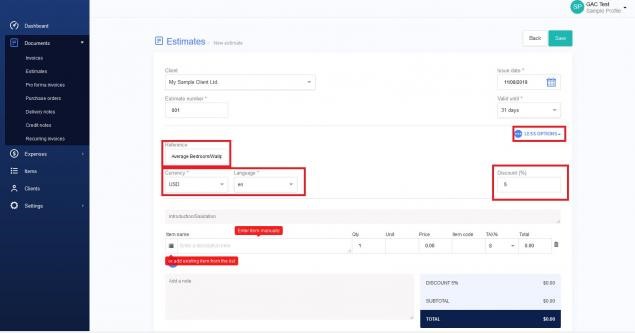
The next step is to click the “More Options” menu on the right side of the dashboard right below the “valid until” box. This section is where you input a reference for the estimate, currency you want to use, preferred language, and a discount if you’re going to apply one.

Payment information in the estimate

Step Seven – Fill In Your Estimate Items One By One

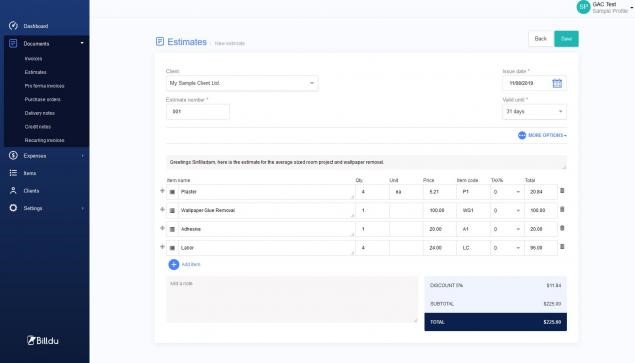
The only thing left to fill in at this point is your salutation or introduction, estimate items, quantity, unit, price, item code, and the tax number. Billdu will automatically total everything as you go along to give you a final price. You want to have every service and product clearly listed here to keep your transparency levels high with your potential customers. When you finish, click “save.”

Adding estimate items

Step Eight – Carefully Review Your Estimate

Billdu will automatically populate your estimate on a neat, clean, and professional template. It’s critical that you take the time to carefully go over it to ensure everything is in, accounted for, and correct. Along the top of the written estimate, you’ll have buttons you can click to edit, duplicate, send, copy an online link, download as a PDF, or discard it.

Review the created estimate

Step Nine – Send Your Estimate to Your Customer

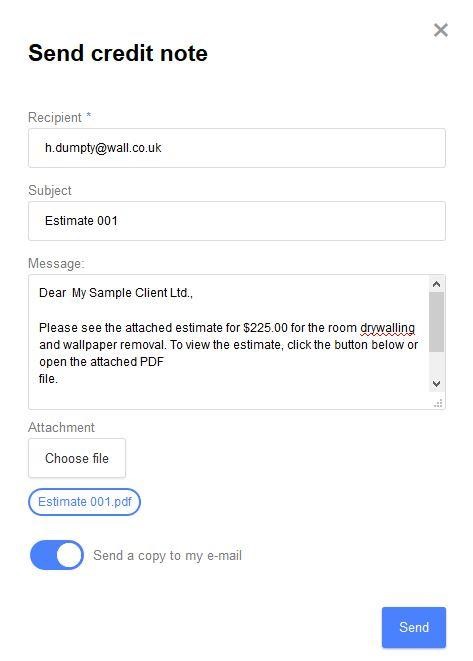
The sooner your estimate goes out to your customer, the better. You can send your estimate straight from Billdu to your customer by clicking the send link. When you click it, you’ll have to fill in your customer’s email, subject, and message. Billdu will automatically attach the estimate to your email, and you can request a duplicate copy to go to your email.

Sending the estimate to the client

Step Ten – Keep Track of Your Written Estimates

If you click on your “Estimates” dashboard, it’ll keep a running tally of all of the invoices you have. The one you just made and sent will update to “Issued.” If your client accepts your estimate and gives you the job, you can update the invoice accordingly. You can also send them a finalized quote with all of the relevant information on it.

Overview of estimates created and sent

Step Eleven – Track Each Change You Make to the Estimate

Billdu has this really neat feature where it automatically keeps track of every action you perform with your job estimates. If you click and open your estimate back up, scroll to the bottom. You’ll see a timeline for that specific estimate. It’ll date and time stamp everything you do, and it’ll keep a running list.

Who Choose Billdu for Your Written Estimate Software?

Billdu gives you the chance to take control of your business’s finances. Since it’s so essential that you know how to track and monitor incoming and outgoing cash efficiently, you want all of the tools in one place.

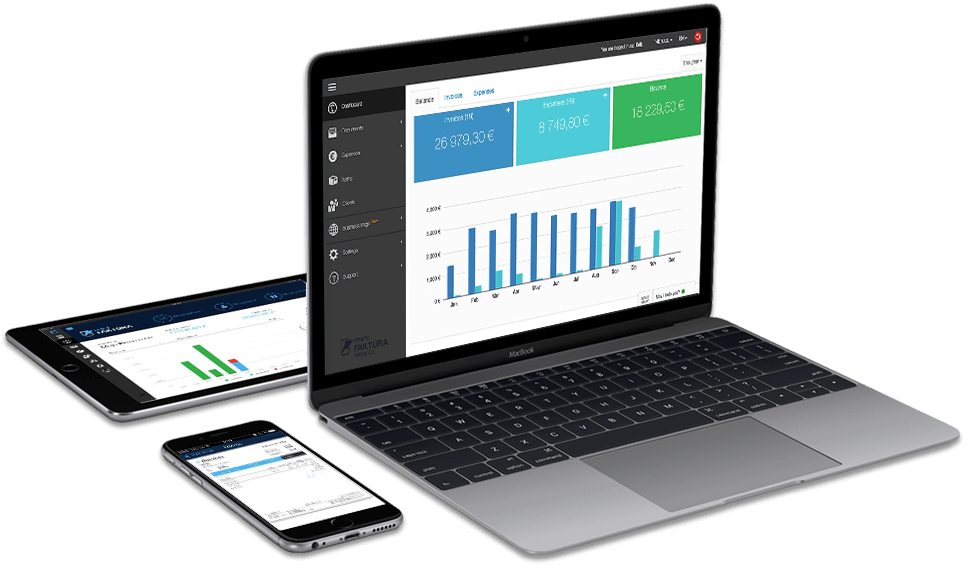
Billdu’s dashboard gives you this centralized location. The dashboard lets you click to see your balance, expenses, and invoices. You’ll get a chart that enables you to see how your business does from month to month and spot patterns, and you can see your outstanding revenue and expenses. In turn, you’ll be able to plan for your business’s future.

Start creating your job estimates with Billdu

Try Billdu today to start creating professional estimates via our user-friendly online dashboard and mobile apps. You can register for a free trial below.

Start for free

Looking for Downloadable Invoice Templates?

We have them ready for you, select your format and get your invoice template now


Business in the 21st century increasingly relies on digitalization and automation. Companies in most fields have found that expanding efficiencies through the use of technology has created additional competitive advantages for them.

One area where technology has advanced rapidly in the past generation is invoice software – or software apps using for invoicing.

Why Do You Need Technology for Invoicing?

Keeping track of the sales process has always proved challenging. In pre-digital days, businesses faced challenges in keeping track of invoices, inventory, and other aspects of getting goods to customers while charging them properly.

Traditionally, businesses used a paper-based invoicing system. Many still do. Using paper-based invoices alone offers one benefit to businesses, that of familiarity. Owners and staff remain comfortable with the system that they have used for decades. If it ain’t broke, they reason, don’t fix it.

The challenge for these businesses comes when the competition adopts the use of invoice generator software, which includes mobile invoicing capabilities. Invoice generator software eliminates the need for hours of repetitive tasks related to manual invoicing. It frees up staff to focus on other core business functions, boosting productivity.

Invoice maker software also moves billing and other communications online, saving businesses in postage costs. Now that business has an advantage over the one that declined to adopt new technology.

Adopting a new software system takes time and resources. In the long term, increased productivity helps it to pay for itself in saved time and money.

A European study demonstrated the increased level of efficiency enjoyed by companies using invoicing software. A clerk reviewing 6,000 invoices per year in the traditional, manual fashion could review 90,000 in the same period.

Additionally, invoicing software can make records easier to use when compiling taxes.

Finally, invoicing software and related applications make needed information available anytime, anywhere. When on business trips, you can track billing on your own without tying up staff by having them track down information.

enerating invoices manually vs invoicing software

What Is Invoice Generator Software?

In its most basic form, the best invoice software programs help your business by automatically generating billing for goods and services provided. Generally, invoicing software creates a list of services and products, adds their cost along with any discounts, and issues the bill through email or other electronic delivery as an invoice.

The invoices come as ready-made templates, reducing time spent while also providing a professional level of consistency in billing.

Online and cloud-based invoicing systems make the process of billing, collection, and recordkeeping more automatic and simple for your business.

What Does Invoice Maker Software Do?

An invoice maker software solution has three main functions that can help to speed the process of billing.

First, it creates and customizes invoices. Invoicing software allows you to quickly populate a premade field with the necessary information, then send it online. No need to create a bill from scratch or even leave your desk to mail it. Invoicing can also be done on your mobile phone when away from the office. You can also make custom changes to bills when appropriate.

Available templates help your invoices look more professional and consistent, helping you to get paid more quickly.

Another time-saving feature in invoice generator software lies in its incorporation of estimates into the process. You can easily shift an estimate for service into an invoice and rely on the system to keep your data organized. Those using the system can also customize how clients or customers receive their invoices. Some prefer delivery, but others require to pick up from an online portal.

Second, invoice software makes both billing and payment much easier to process. Invoicing software usually offers the capability of creating an online portal to allow for automatic payment, including using credit, debit, or electronic checks. It also can automatically accept and translate foreign currencies into US dollar equivalents and interface with payment apps such as PayPal.  Offline traditional payments can be noted and tracked, as well.

Invoice software can also be customized to work from a platform and connected to your business’s mobile phones. You can get invoice software for iPhones, iPads, Androids, and other Mac/iOS platforms.

Finally, invoice software can provide more than fast processes. You can also set it up to generate reports and even analysis. It can examine, for example, which clients pay on time and which habitually pay late. Invoicing software can help you create a database with information that can help you adapt more efficient billing and payment practices.

Invoicing software serves almost like additional staff in that it performs traditional billing functions much more efficiently while offering data analysis.

What Is the Difference Between Invoicing and Accounting Software?

Sometimes even business owners get confused about the differences between invoicing and accounting software. This happens often with small businesses and startups run by individuals without a lot of business administration experience.

Invoicing software has a different function than programs designed for accounting. While invoicing and payment represent a key part of accounting, accounting must keep track of the larger picture.

Additionally, accounting software usually does not provide all of the helpful features that elevate invoice maker software solutions above traditional manual practices.

Happily, accounting and invoice software can work in an integrated fashion. When used together, they can serve as a comprehensive picture of your accounts for tax purposes.

Differences between accounting and invoicing softwarePros and Cons of Using Invoicing Software

Invoicing software can offer several advantages and disadvantages, depending on your business.

Disadvantages of Using Invoicing Software

First, invoicing software sends out automatic bills to email in most cases. You have to inform your customer to watch his or her spam feed. Automatically generated invoices will often end up in these files, making them difficult to notice when they come in.  Many late payments occur because the client never saw the bill.

Using online invoicing exclusively to the exclusion of other systems can prevent you from engaging your full customer base.  Depending on your market, some may not have access to consistent internet with any quality. They may also choose to not pay or receive information online. In this case, you should have a manual billing system that works alongside and with the software.

Also, there is no global standard for invoice software.  Those who have learned one system in another capacity may have to relearn invoicing over again when they come to work for you.

Advantages of Using Invoice Software

The advantages of using invoice software far outweigh issues that its use might lead to.

The disadvantages have easy fixes that offer little or no additional cost.  First, notify the customer that the invoice may end up in his or her spam folder. Follow up phone calls can be made after a reasonable time with no response.

Second, identify customers that have issues with online invoicing or using the internet in general. You can generate traditional bills, but also need to make sure that information gets entered into the system properly.  Most businesses will have few customers who find this form of invoicing problematic, unless in specific fields that have an older market or target people in remote areas.

You will also see an advantage in its ease of use. Once you and your staff master the system, which is easy for those of all levels of experience to learn, you will find it easier than hand-writing and mailing bills.  You will also save the cost in postage by using email or pay portals.

Another advantage lies in the reliability of delivery. Even if the invoice ends up in a spam folder, it still almost always gets successfully delivered. Confirmation of delivery is simple. Traditional delivery through the postal service brings a much higher chance of the bill getting lost in the mail.  Also, even when bills reach their destination, disorganized customers may lose or misplace the bill.

With invoice software and apps, you will know the exact time and date of delivery.  You may also be able to receive messages when the bill gets opened.

Most importantly, using invoicing software saves money. You use less postage, and your staff invests fewer work hours into getting your business paid.

Pros and cons of invoicing software

Other Helpful Features of Invoice Software and Applications

Invoice software offers several helpful features that make the process easier and more productive. These include several options that can enhance even the professional appearance portrayed by how you bill.

Most invoice software offers a range of invoice templates reflecting different professional style designs, each appropriate to different types of businesses. Graphic designers who put these together understand that a construction contractor will want a different look to his font and other elements of the invoice then a pastry shop, for instance.

Many invoice programs offer easy quote conversion. The program will submit a quote to the client or customer. If they click that they approve the quote, it can automatically transform the quote into an invoice to be sent at the proper time.

Invoice software also contains your full range of prices, if inputted. It can quickly figure a total cost for goods and services, replacing the need to manually look up needed pricing information.

Use your invoicing software to help you keep track of inventory.  You can set up the program to automatically deduct inventory from your stock list once it gets marked as shipping out.

Invoice software gives you multiple options when it comes to making a customer aware of their bill.  Although most prefer to send out invoices via email, you may set up an invoice portal with the software. Instead of sending an invoice, you message them a link where they can come and make a payment.  This option enables you to know when the customer accesses the page and pays for the product or service. Also, you can more easily correct errors in the invoice in a portal under your control.

Card Payments

Using invoice software makes it easier to accept credit cards and debit cards or perform ACH withdrawals. Importantly, it also enhances your data security. When automated systems take payment information, they can lock it away in a secure silo or delete it as soon as it is no longer necessary to have. The system can also restrict access to sensitive personal information. With industry guidelines now spelling out consequences for data breaches, it is vital that your payment systems be secure. Invoice software can serve as a part of that process.

When fully integrated into the full range of in house and mobile devices, invoice software can enhance convenience.  Tradespeople, for example, can send a bill from their mobile phone directly at the close of a job. This helps to ensure that the vital step of billing

Invoice software can go a long way toward helping your business manage its accounts receivable. When bills get paid, the software can automatically incorporate the information into the system and give you an up to date account of current payments.

Invoice Alerts

Additionally, you can instruct the software to set up a system of alerts on each invoice. You can set them for any period, but normally they alert business owners after 30, 60, or 90 days. Once non-payment has hit the preset stage, the system can alert you as to which accounts are overdue. Alerts can also go out to clients and customers, reminding them of due and past due bills without involving your time.

Billdu Set up alerts for unpaid invoices in your invoicing software

Financial Forecasts and Projections

Most businesses make the creation of financial forecasts and projections part of their standard operating procedures. Financial forecasts tend to envision business performance over a year’s time, while projections run from at least a year. These statements are related in that they can be used for internal or external purposes in predicting business performance in the future. Internally, companies use them to inform the team of expectations. With those outside of the company, they are most often used to attract investors or other stakeholder support. Much of the information that invoice software collects and organizes would help in the production of these statements.

Invoicing software can also work seamlessly with automated debt collection systems for accounts too long overdue. They can also serve as reliable records for when accounts get turned over to official collections agencies.

Register today with Billdu for a free trial. Find out why Billdu has the easiest and most effective invoice software systems.

Easiest and most effective invoice software system – Bildu

Try Billdu today to start creating professional invoices and tracking your expenses via our user-friendly online dashboard and mobile apps. You can register for a free trial below.

Start for free

Looking for Downloadable Invoice Templates?

We have them ready for you, select your format and get your invoice template now


Every product you roll out for your business needs a business plan presentation. We’re going to go over business plan design, presentation and more below, so you know exactly how to formulate your new product business plan.

Defining a Business Plan

Have you ever thought of a new product and jotted a few ideas on things you needed to do to turn your idea into a reality? If so, you’ve already written a basic business plan, or at least the key components. At the core, a business plan is simply a plan for how your product would work and what you have to do to bring your product to life and make it exceed.

A business plan ranges from a single page to several pages. Most businesses can get by with a very lean plan with a few bullet points that focus on your product strategy, tactics you’ll use to develop and sell your product and milestones that’ll help track responsibilities and tasks. It should also include the financial projections you’ll have to apply to your product, like budget, cash flow and expenses.

How to Design a Product Business Plan

Before you present your product business plan, you have to design and write it out first. We’re going to outline everything you need to do to write a concise and strong product business plan that sells. The steps are:

Step One – Research, Research, Research 

Analyse and research your product, your target market, and your objective expertise. Ideally, you’ll spend twice as much time on this step than you’ll spend on actually writing the product business plan. Evaluate your product and think about what you want to do with it. You have to know your company inside and out, what your product brings, any competition you may have for it. Also, do not forget the market in which you want to sell it. It’s your job to know everything you can possibly know about the market your product will enter, to build your case on why your product will beat your competition.

Step Two – Determine Your Plan’s Purpose

A product business plan is a written document that describes the product, your marketing and sales strategy, the financial implications and a profit and loss statement. Think of it as a plan or map that helps you avoid bumps in product production. If you want to attract investors for your new product, your plan will have a different purpose. Now you’ll have to write out a business plan that targets your potential investors, so it will be as concise and clear as possible.

Step Three – Create a Product Profile 

Your product profile includes your audience, target market, resources, what makes your product unique, and how your product will solve a problem. Use this profile to attract your potential customers, and to describe your product plan as well as your company. This is one of the first written parts of your plan, and having this product profile makes the entire plan come together much more quickly.

Step Four – Document Every Aspect of Your Product

Any potential investors or your company board want to see how your new product is going to generate revenue for your company. Because of this, investors and the board want to know everything possible about the product. To help you with this process, you want to document everything from your cash flow and expenses to any projections you have. Don’t forget any minor details, like the licensing agreements and location strategy.

Step Five – Set Up a Strategic Marketing Plan

Defining a Business Plan - Prepare a Marketing Plan

A solid product new product business plan / marketing plan will always include an aggressive and strategic element. You’ll want to outline various marketing objectives, such as:

  1. Product outline
  2. Defining business plan images relevant to your product and/or product function
  3. Building and extending the market for your product
  4. Breaking into new markets with your product
  5. Boosting sales for your new product, and be specific
  6. Cross-selling your new product with another
  7. Entering into a long-term contract with targeted clients
  8. Raising prices without taking away from sales
  9. Refining your new product
  10. Having a content marketing strategy in place to generate interest
  11. Enhance your product delivery and manufacturing process

Every new product plan should have several goals outlined, along with tactics for hitting these goals with new products. So now focus on the “what” and “why” of your marketing plan for the product’s debut year, followed by the “where”, “who”, “how” and “when”. Now it’s time to allocate a budget for every activity you plan for your new product. Create separate budgets for your out-of-pocket costs and your internal or staff costs.

Step Six – Make Your Product Plan Adaptable for Different Audiences 

Your potential product plan will have a varied bunch of readers that range from employees and venture capitalists to bankers or investors. Each type of reader has different interests, and you need to know these interests up front. This way, you can take them into account when you write up your business plan for specific audiences. For example, your staff will be more interested in the plan’s objectives while the investors will be more interested in cash flow statements and balance sheets. Make sure you can easily modify your business plan design and tailor it to your audience.

Step Seven – Explain Why Consumers Need This Product 

No matter if you want to share your plan with a customer, investor or team member, plan has to show that you’re dedicated and passionate. You have to show that you care about expanding your business product line, list the problems the product will solve and lay out what makes your product stand out from your competition. Maybe your product helps people do something more efficiently, or maybe it helps speed up a certain process. By explaining what your product can do for your audience, you can create an emotional connection with people who will support your product from the launch date onwards.

How to Present a Product Business PlanHow to Present a New Product Business Plan
Once you write out your new product business plan, it’s time to decide how you want to present it. Business plan presentation is key to getting your product off to a strong start and to generating interest. Take a look at how to present a business plan in seven steps.

1. Get Referrals and Leads 

If you have outside investors that can help with your plan, you need their phone numbers, names and addresses. Initiating a client referral program can significantly enhance your networking efforts, encouraging existing contacts to connect you with potential leads.

Start networking, and talk to people you know who can help launch your new product. Ask your people you know for referrals, and make sure to get in touch with the people who you get referrals for. You can also consider buying leads using innovative platforms to grow your business.

And if you are catering to B2B, make sure you are selecting B2B data providers that provide the best solutions for your needs. Lead411, Zoominfo, and Apollo.io are three of the best on the market. 

2. Research Your Target 

Learn as much as you possibly can about the industries your product will end up in, how much money you or other people will invest in the manufacturing process, and any other requirements. Look in venture capital directories and get an idea of where to present your product.

3. Make a Sales Pitch 

Mail or email an introductory letter to your target audience that lets them know what plan you’d like to send to them. Sending an introductory letter is your way of subtly asking the audience if they’d be interested in reading your product business plan. In this introductory letter, you should explain why you’ve picked this person and what your product offers. You also want to explain what you’re looking for from the person like a loan, investor or a long-term supplier relationship. If you have a referral, you want to include who referred you in the start of the letter. Better never underestimate how powerful a referral can be.

Finally, you might want to include the terms under which you present your product plan. You might mention that you’re not sending your plan out to any other investor, or you may disclose that you’re contacting multiple investors. You should let the recipient know whether the communication is confidential or if they can pass it on to someone else. If you plan to include a non-disclosure agreement, you should send it between the introductory letter and your actual business plan.

If they don’t reply within a week, send a short follow-up email, and send a third around two weeks later. If they still don’t respond, look to other sources of investment.

Billdu How to Present a Product Business Plan Make a Sales Pitch

4. Try Face to Face Meetings 

Despite the fact that we’re in the midst of a digital age, you should try to meet up face to face. This is especially true if you want to actively seek investors because it’ll be hard to convince them to commit to investing in your products simply through email or texting. Skype may be a viable option, but an in-person meeting is still the best shot you have to make a major financial commitment. If they want you to communicate exclusively via electronic means, follow their lead.

5. Be Prepared to Counter Objections 

You may think that your business plan answers every question your audience has, but you haven’t. You have to go into everything prepared to counter objections like assumptions about your product and your potential competitors. Have members of your team, co-workers and friends play the devil’s advocate and throw every possible direction they can think of at you and ask the tough questions. In turn, you’ll have your answers ready with it comes up for real. 

6. Lock in Those Commitments

The new product business plan can help you get money for the product development. You won’t get investments in your product unless you ask for them. Once you’ve gone through all of the potential objections, be ready to offer one final concession. It could be something like an ownership percentage for your product or a board seat. Offer this as your last concession and close your deal.

7. Keep Time in Mind

When it comes to pitching your presentation, keep time in mind. You want a more formal pitch presentation for your investors. Cover all of the elements we outlined earlier. Ideally, your entire pitch deck template should last 20 minutes at the very most, and you should have a slideshow that highlights your business plan. Keep it to 10 slides or less with a host, of business plan images and diagrams to get your point across. Increase audience engagement with top-notch presentation slides.

How Billdu Can Help With Your Product Business Plan

Billdu is a user-friendly cloud platform that helps you organise your business’ finances all in one convenient place. You can seamlessly track how your company is doing, and pull invoices or expenses quickly and easily when you need them for the product business plan writing and presenting stages.

Our platform also gives you a great idea on how feasible it is for your business to launch a new product. If you find that your business doesn’t have the cash flow to support everything that comes with setting up your business plan, it won’t look good to your potential investors. However, using Billdu, you’ll know this before you draw up your business plan. It’s an essential tool for helping keep your business on track, and you can generate different types of reports to use in your business plan based on everything Billdu has to offer.

Try Billdu Today!

Are you ready to see how Billdu can help you enhance your business plan and give you all of the information you need to write and present a successful product business plan? If so, you’re in luck! Click the button belowe to try Billdu for free today.

Prepare the Inputs for Your New Product Business Plan

Try Billdu today to start creating professional invoices and tracking your expenses via our user-friendly online dashboard and mobile apps. You can register for a free trial below.

Start for free

Looking for Downloadable Invoice Templates?

We have them ready for you, select your format and get your invoice template now

If you routinely charge your customers on a set basis for ongoing goods and services, you’ve most likely heard of or set up a recurring invoice. If you haven’t and you’re wondering, “What is recurring invoice?” this post is here to help.

We’re going to go over all these points:

  1. Defining automated billing
  2. Why automated billing is important
  3. Why you’d use automated billing
  4. How Billdu can help you create fast and easy recurring payments

Defining Recurring Billing

Recurring invoices are very popular with modern business around the world because they give them the ability to automatically charge their customers an agreed-on amount for products or services. You typically submit your recurring invoice or apply your charges once a month on the same day each month.

However, you have to get permission from the customer to charge them on a monthly basis before you can set up and use your recurring invoices. You’ll continue to send your customer these charges each month until the end of their contract or until the customer withdraws their permission.

You see these types of invoices with cable companies, software businesses, utilities, cell phone bills, magazine subscriptions, and gym memberships.

They’re also popular with companies who set up recurring orders for inventory items. You bill them once a month when you drop off their inventory items, and you have a specific payment due date a week or two later.

Breaking Down a Recurring Invoice System

Recurring billing offers a layer of convenience for your customers. Instead of having to get in touch with them and have them provide their payment information each month, the cardholder can authorize you to hold their details and simply charge a set amount each month you deliver the services or products you agreed on.

For example, a customer could set up an order through your store for four bags of dog food on a three-month delivery schedule. Every three months, the order would go out, and you would get a payment through your automated billing system.

Limitations to Recurring Invoicing

This system does have a few limitations. For example, it can be slightly more in-depth when it comes time to correct any billing errors. Instead of getting a bill and checking it over, noticing a mistake, and resolving it before they pay, the recurring billing system will automatically bill the customer the incorrect price. You can issue a credit note, but it can take days to notice it.

The safest thing to do is to agree to set up recurring invoices for payments that are either exactly the same or right around the same amount each month. They also should stay on a schedule, and you should give them a quick once-over.

If a customer forgets about a payment and they overdraw their account, it can cause a headache on their end as well.

Benefits of Using Automated Billing

There are several distinct advantages to using recurring payments and automated billing through a service like Billdu. We’ve picked out seven different benefits and outlined them below for you. This can help you decide if you should implement this service or not. 

1. Boost Your Cash Flow

  • Recurring invoices help you get a steady stream of cash flow on a monthly basis. They also improve your cash flow from one month to the next.This helps you plan out any expenses or costs associated with your business that you have to pay. Additionally, they improve your cash flow projections.
    For example, when you pay your monthly internet bill, the company knows that they have a certain amount of money coming from you and their other customers.

2. Speeds up Payments

  • Humans are creatures of habit, and we are all used to paying our regular bills like utilities, cable, rent, and the phone bill. By sending our recurring invoices at the same time every month, you encourage your customers to get in the habit of paying at the same time every month. Additionally, almost any software allows you to link directly to your customer’s credit card to add a layer of convenience and prompt them to pay you.

3. Reduces Payment Chasing Times

  • Recurring invoices can speed up your payments be ingraining good habits into all of your customers. In turn, you spend less time chasing after your payments. You won’t have to worry as much about sending late notices or warnings. Additionally, it’s good for your customers as well! They won’t have to try and remember to make their payment each month and get late fees if they miss it when they set up a bill payment scheduler.

4. Improves Relationships with Customers 

  • Instead of your customers seeing your business as another “ad hoc” vendor, they’re more likely to view you as part of their ongoing budget and extended team. This is how many businesses form anchor clients that they can depend on year-round for orders and a steady income stream.

5. Automates Payment Processes 

  • By using Billdu, you can easily create your recurring invoice using a template. It lets you set your payment schedule, make any changes as they happen, and link a payment method. It gives you the peace of mind that comes with knowing that your invoice goes out the same time each month to encourage prompt payments.
    Additionally, you can use the platform to review any recurring invoices on a month-to-month basis before they go out. It’s an excellent option for people who have fluctuating invoice values like utility companies. Or, maybe you have a recurring invoice in place for $200 worth of products, but the customer wants to order $250 one month. You can adjust it accordingly. 

6. Saves Time

  • There’s no more spending hours pouring over dozens of paper invoices, preparing them, and dropping them in the mail. You can use automated billing to send out the invoices without any additional effort on your part. In turn, this frees up your time to concentrate on your day to day operations. 

7. Eliminates Hidden Costs

  • It may only take a minute or two to get an invoice in the mail, but you have to multiply this by hundreds or even thousands of customers. It really adds up, and it can add a lot of hidden costs to your budget. A bill payment scheduler is one way to cut out the majority of these costs and save your business money that you can allocate to other areas that need it.

How to Use Recurring Invoices

There are several ways you can use recurring invoices in your daily operations. For example, you have a customer who wants to order the same product or service once a month, and it costs $150. You’d bill them this amount each month and send them the product or service.

However, the customer lives in a tourist area, and they want to order $300 in products and services for three or four months out of the year. All you’d have to do is set up your recurring invoices for the eight or nine months out of the year and adjust it accordingly when they requested more.

All of your small changes show on the invoice, and you can even add notes, so the customer remembers why they pay more in certain months compared to other months.

Why Choose Billdu for Your Bill Payment Scheduler

Billdu offers several advantages for our customers to enjoy when they use our software to set up and send recurring payments and invoices. Each of our customers, both large and small, can enjoy the following:

  1. User-Friendly Design – Unlike some types of invoicing software, Billdu strives to make our software very user-friendly and easy to navigate. We give you a minimalist design that isn’t cluttered by unnecessary distractions. Also, you don’t have to click multiple times to get to your recurring invoices. 
  2. Flexible – It’s extremely to set up, send, modify, and delete recurring invoices as you need. This flexibility makes it easy and fast to monitor your cash flow and your accounts. If you need to adjust the price or items, it’s just a few simple clicks and you’re ready to send out your new invoice. 
  3. Centralized Location – Your dashboard gives you one centralized location for all of the documents you create. They cascade down your screen, and you can tell at a glance whether or not the client paid you or if there was a problem in the billing process. 
  4. Mobile App – Billdu’s mobile app makes it easy to check your accounts on the go. All you do is download it and open it on your phone. You can instantly access all of the important documents you set up for your business’s finances.

Creating Recurring Invoices with Billdu

Billdu is a very user-friendly software system that makes it easy and quick to create recurring billing and send our recurring invoices using templates.

We’re going to show you a guide that goes step by step that gives you everything you need to create and send out your own recurring invoices. We can help you make a single recurring invoice, or you can set up dozens all from one central location.

Step One – Create Your Account 

The first thing that you want to do is visit Billdu.com and click “create account” under the login button. When you do this, it opens a new tab where it’ll prompt you to fill in your Business Name, a valid email, and a password. Fill it all in and hit “create account.” Billdu will redirect you to your new dashboard.

Create Billdu account before creating a Recurring Invoice Template

Step Two – Get Comfortable with Billdu’s Dashboard 

Billdu has a very sleek and user-friendly dashboard for our customers to use. It’s encouraged to explore the platform in order to get used to where everything is. This shouldn’t take too long to do, and you’ll be able to complete a host of tasks all in one centralized location.

On the left side of the dashboard, you’ll notice icons labelled “Documents,” “Expenses,” “Items,” “Clients,” and “Settings.” You want to click on Documents to start.

Start creating your recurring invoice

Step Three – Open the Recurring Invoice Template 

When you click on “Documents,” a small menu will appear under it. You want to locate the Recurring Invoice document. It’s the seventh and last document in the list. Click on it. Doing this will open the recurring invoice template dashboard, and you can click on the blue + New Recurring Invoice button on the right side.

Billdu Create a recurring invoice for an Automated billing

Step Four – Filling in Your Recurring Invoice 

You’ll fill in all of your blank spaces in your template. You can input a name or description, issue date, recurrence, send an email (yes or no), cycles, client, and a due date.

Set up Automated billing details and schedullerIf you click the Other Options button, it’ll prompt you to fill in the payment method, currency, language, and an optional discount.
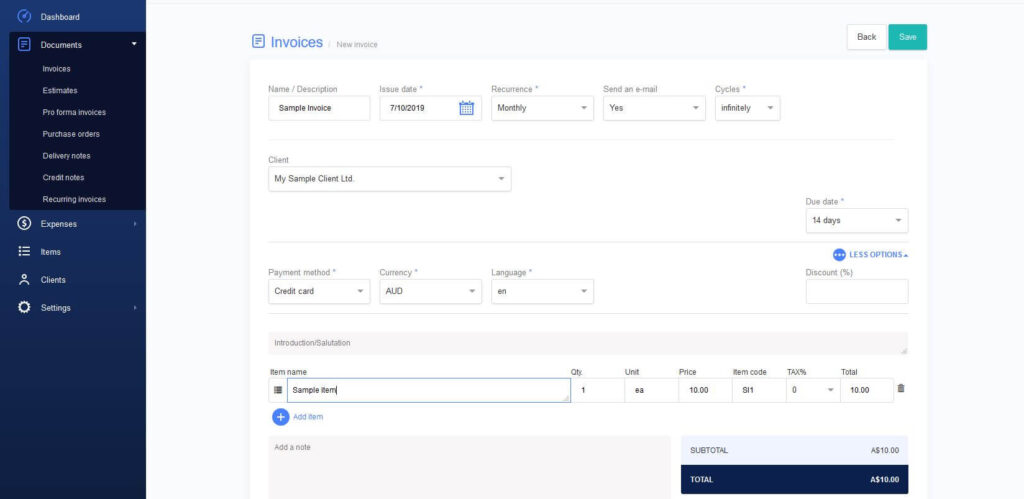
Set up Automated billing detailsYou can write a short introduction or greeting before you add in your items. You’ll fill in the item name, quantity, unit, price, item code, and tax before the software populates the total for you. When you finish, click “save.”
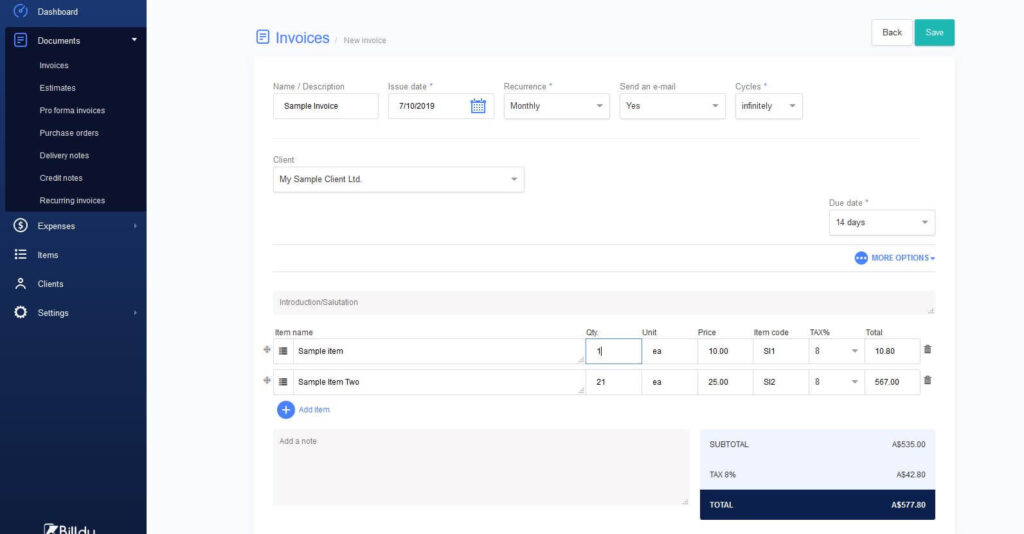
Set up products into your Recurring invoices

Step Five – Edit and Monitor Your Recurring Payments as Necessary 

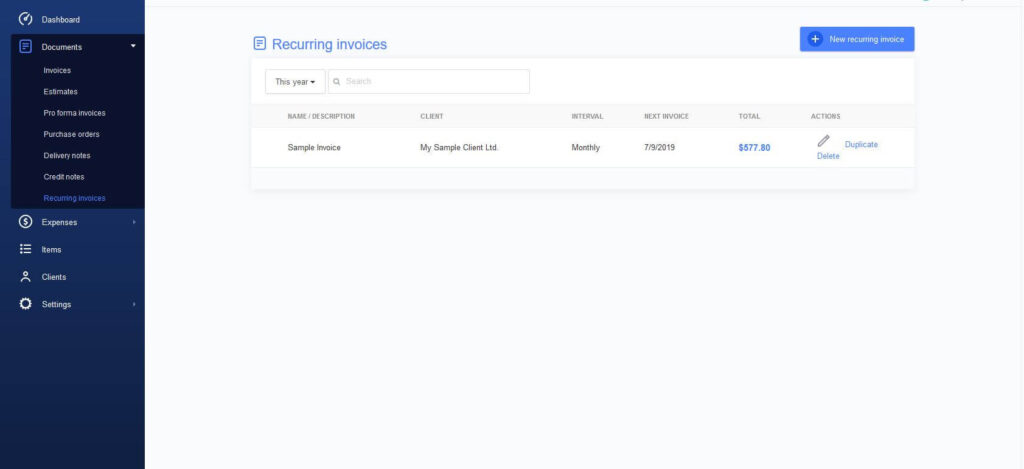
Hitting save will save the recurring payment and send you back out to your dashboard. Each payment you set up will cascade down the list. It shows a short description, the client, interval, when the next invoice goes out, and the total. You also get the ability to edit, duplicate, and delete it as you see fit.

Manage your Automated Reccuring invoces in the Dashboard

Start creating automated recurring invoices with Billdu

Try Billdu today to start creating utomated billing invoices via our user-friendly online dashboard and mobile apps. You can register for a free trial below.

Start for free

Looking for Downloadable Invoice Templates?

We have them ready for you, select your format and get your invoice template now

What is a purchase order, and how do purchase orders work? If you have a business, you’ve most likely created a purchase order at some point. Purchase orders are an essential part of any transaction, both large and small.

If you’re not sure what they are, this post is for you. We’re going to go over all the following:

  • Purchase order definition
  • Difference between a purchase order and an invoice
  • How purchase orders work
  • How to create a purchase order in Billdu

Define PO (Purchase Orders)

What is PO? Simply put, a purchase order is a document that a seller writes up or makes on software. They send two copies. One copy goes directly to the seller, and one copy goes internally and attaches to the specific account.

This purchase order is an exact summary of the services, goods, or products the buyer wants to purchase from said seller.

The purchase order will include a list of the services or quantities, the quantity, and the price. Once the seller agrees to the invoice, it turns into a legally-binding contract for both the buyer and the seller.

This is why it’s essential that the buyer is extremely clear in communicating exactly what they want to buy and the quantities. The last thing you want is the seller to be confused when they get their copy of the purchase order.

At the very least, your purchase order should have the following:

  • Date the buyer issued the purchase order
  • Name and address of the buyer
  • Name and address of the seller (supplier)
  • Details about the goods or services purchased (list with exact quantities and final price)
  • Terms and conditions of the transactions
  • Purchase order number

If your purchase order doesn’t have these items in the very least, you’re setting yourself up for legal and accounting problems down the line.

Purchase Order vs. Invoice

But, isn’t a purchase order the same as an invoice? The short answer is no. These are two very different things.

The seller sends an invoice to the buyer, and this invoice contains a summary of the services and goods the buyer already bought or agreed to buy. An invoice usually comes after both parties agree on a purchase order, and the buyer sent the payment.

You can also send an invoice after you’ve delivered goods and services (popular with freelancers), and it usually contains a payment due date. An invoice also becomes a legally binding contract between the buyer and the seller, and it totals the debt that the buyer owes.

Invoices should contain:

  • Agreed-upon prices
  • Any discounts or taxes
  • Date the invoice is issued
  • Details and quantity of the goods and services provided
  • Invoice number
  • Name and address of the seller
  • Name and address of the buyer
  • Payment due date
  • Purchase order number, if a PO was issued
  • Transaction terms and conditions (optional)
  • Total amount that is due

So it’s not so overwhelming, we’re going to break down the basics between a purchase order vs. invoices in the table below.

Purchase Order Invoice
Document buyers use to order goods or services from the buyer. Document sellers use to notify a buyer that they have a payment due
Buyer issues it Seller issues it
Buyer sends it to the seller Seller sends it to the buyer
Purchase order comes before an invoice Invoice comes after the purchase order
Defines the terms of the sale Confirms that there was a sale

Purchase Order Process

There are three main components to the purchase order process. The nice thing is that it rarely varies from transaction to transaction. It’s a very common interaction between large and small businesses.

Submitting the Purchase Order

The buyer prepares the purchase order, and it usually comes from their purchasing department. Electronic software systems are very popular because it seamlessly lets you track each purchase order and submit purchase orders to your suppliers electronically.

The purchase order usually has unique purchase order numbers. This helps you match shipments with purchases. Most software programs have entry fields that allow you to input each piece of critical data we outlined earlier, and you fill it in before you send it off.

The Buyer’s Responsibility

When the buyer submits their order, it creates an in-progress purchase. The order’s status won’t move from “in-progress” until the items the buyer ordered gets to their store or warehouse. Once the buyer gets the physical order, they scan it into their inventory and match it to the corresponding purchase order. The purchase order’s status changes to either “payment required” or “processed.”

The buyer finishes the transaction when they pay the seller. The payment should have either a company account number or purchase order numbers.

The Seller’s Responsibility

The seller or supplier use purchase orders to fulfill orders and process payments. When they get a purchase order, they use it to pull the correct inventory and get it ready to package and ship to the buyer.

When the seller gets the inventory, they use it to generate an invoice. They next record this shipment into their inventory system when they ship the products.

The purchase order gets an electronic filing, and there are usually paper copies around too. They mark the order as “awaiting payment” or “filled.” The seller also uses this time to set deadlines and payment reminder dates. This system allows the seller to monitor for payments and enforce their policies.

Once the buyer gets the products and the seller gets the money, they complete the transaction. This is the time they close out the purchase order and end the legally binding contract. Each time they open a new purchase order, a new legally-binding contract opens.

Who Are Purchase Orders Useful For?

Purchase orders are important for any buyer who wants to get services or goods from a supplier, vendor, or seller. They may seem like nothing more but a lot of unnecessary extra work, but they can save you a lot of hassle. This is especially true if your purchasing demands go up.

Demand fluctuates, and it eventually gets more urgent, specific, and complex. This is where mistakes come in, and it can cause discrepancies between what a buyer wants and what they end up getting.

Your purchase order adds clarity to everything you do. This makes them extremely useful for any business or person who routinely buys goods or services. And it should be an internal part of the financial process. They help you lock in specific details of every transaction you have with your business.

For example, if you want to buy five bags of concrete at $8 per bag, you can lock in a $40 total without worrying about price fluctuations. This is great for alleviating any confusion, and it can save your business money.

Additionally, purchase orders protect you from lawsuits. As long as you hold up your side of the purchase order, it’s a legally-binding contract.  The person you have a transaction with won’t be able to claim that someone shorted them because they agreed to the purchase order.

Why It’s a Good Idea to Automate the Purchase Order Process

If you currently use a paper-based purchase order system, it’s almost a guarantee that you’re creating and using too many documents. Many companies end up processing around seven different documents throughout the purchase order process. This includes:

  • Requisitions
  • Quotes
  • Goods received notes
  • Purchase orders
  • Order acknowledgments
  • Invoices
  • Packing slips

This is very difficult to keep track of with a low volume, let alone a high one. It can quickly get overwhelming, and the risks for losing items or having errors is extremely high.

Good recordkeeping is a critical part of any business, especially the purchase and procurement process. However, it’s very easy to damage, lose or destroy a paper-based system.

It’s also harder to find older purchase orders, duplicate them upon request, find missing transactions and find invoices in this system. This can cost your business money and time.

Also, a paper-based system requires a thorough filing system that you have to keep updated on a routine basis. The filing system will take up a lot of space, and it also requires people to keep it current.

Using a system like Billdu allows you to quickly and easily digitize the whole process by utilizing electronic purchase order and electronic documents. You can track all of the documents using one centralized system that gives you a clear audit trail to tell you exactly who performs different actions in each step of the purchase order process.

It also allows you to upload other vendor documents and POs like terms, prior contracts, and payment schedules. In turn, you’ll easily be able to track all of your vendor information without a problem.

Additionally, it also makes things easier for your accounts payable department because everything is one system. It makes it quick and easy for them to covert any orders you get and turn them into invoices. Your payment processing system will also get much easier.

Creating Purchase Orders with Billdu

With Billdu, it’s relatively easy and straightforward to create and monitor your purchase orders. We’re going to outline a step-by-step guide with screenshots so you can see exactly how useful this product can be to you.

Step One – Create an Account 

The first thing you do is go to Billdu.com and click “Login.” This will open a new tab. You click “create new account” and input your Business name, email, and password. Once you get it in, click “create account” to finish the setup process.

Create Billdu account

Step Two – Navigate Your Dashboard

Billdu will automatically direct you to your dashboard once you create an account. If you look to your left, you’ll notice a list of icons you can click on including Dashboard, Documents, Expenses, Items, Clients, and Settings. You want to click on “Documents” and find “Purchase Orders.” When you click on it, it’ll open in your dash. Click on “New Order” in the right corner to start.

Create a new Purchase order

Step Three – Click “New Order” and Fill It In 

Once you click on “New Order,” the purchase order format will open in a tab. When it does, you fill in and click save when you finish:

  • Business Name
  • Country
  • Street
  • Zip Code
  • City
  • Province/State (if applicable)
  • Type
  • Contact Name
  • Email
  • Phone
  • Fax (optional)
  • Website (optional)

Create a new Purchase order

Step Four – Fill in Your Purchase Order 

A new screen will show up that prompts you to fill in your Client, Order Number, and Order Status. If you click “More Options” on the right, it’ll let you choose your payment method, delivery type, currency, language, and discount.

Finish the details in new Purchase order form

If you scroll down a little once you finish with this section, you’ll see an area that allows you to include a short greeting, the item name, quantity, price, item code, and tax. It’ll total it automatically as you enter items, and it’ll also apply the discount if you offered one. You can add a short note too. When you finish, click “save.”
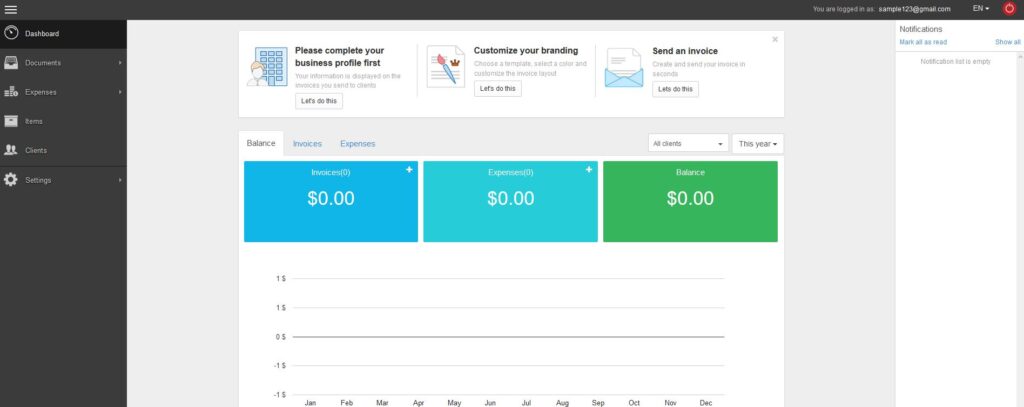
Finish the details in new Purchase order form Add notes

Step Five – Generate the Purchase Order

Billdu will now generate a purchase order based on whatever information you put in during step four. You can easily go back and edit it, download it, change the status, email it, cancel it and much more all from the dashboard.

Generate the Purchase order

Step Six – Monitor and Update Your Purchase Order as Needed

When you generate a PO, you can now go back to your dashboard by clicking on the “Dashboard” icon up in the upper left. You’ll get a running total of your purchase orders along with their status. You can use this to track everything and ensure that you get everything you need so you can send payment.

See all the Purchase orders in your dashboard

Start creating your Purchase Orders with Billdu

Try Billdu today to start creating professional Purchase Orders via our user-friendly online dashboard and mobile apps. You can register for a free trial below.

Start for free

Looking for Downloadable Invoice Templates?

We have them ready for you, select your format and get your invoice template now


If you have a business, you know what an invoice is. You are probably also aware that Billdu helps you create invoices on the go. But, have you heard of a Proforma invoice? If not, you could be wondering what is a Proforma invoice? We want you to understand exactly what this vital piece of your business is, we’re going to outline it for you. We’ll also walk you through a step by step tutorial on how to create a pro forma document using Billdu’s printable proforma invoice templates.

Understanding a Pro Forma Invoice

As a seller or business owner, getting clients, negotiating the working relationships terms, and deciding on a price all common business practice. However, you want to ensure that everyone is on the same page once you work out all of the finer details that come with negotiating a new contract. This is where a pro forma invoice comes. Basically, it acts as a precursor to your official invoice.

This document will let your clients know exactly what services or products you’re going to deliver, your timeline for delivering said goods or services, and how much the project will end up costing your customers. It’s a short heads up before you send the normal invoice for payment, and it can help your customers from being blindsided by the price or duration of the project.

It helps everyone get on the same page for expectations, and it also gives your customers time to organize their finances so they can pay your invoice when it comes through. It’s essential that you know that your pro forma invoice isn’t a true VAT invoice though. However, it can help your project go along more smoothly because everyone will have the same expectations.

There are dozens of reasons why you’d want to use this type of invoice for your business, and they include but are not limited to:

  • Declare the value for your services or goods
  • Inform your customers of the payment terms and the due date
  • Let your customer know which payment methods your business accepts
  • Notify your customers of the delivery details and dates
  • Outline the goods or services your business will provide
  • Send your customers a statement of how much your services or products will cost

It works to square away the many small details that can hinder a project or a payment, and it ensures that everyone is ready for the project to start or to receive the goods they need. Once you officially start the project or deliver the goods, you can send out an official invoice.

Items to Include in Your Proforma Invoice

Before we walk you through how to create a proforma invoice, it’s important that you know everything that you should include. This way, you can be sure that you populate the correct fields each time you use a pro forma invoice template at your business. 

Header 

The first section you’ll work on filling in is your header. It’s extremely important that you have the words “Proforma Invoice” clearly displayed here. Your header should also contain your business’s logo and name. It makes it easy for your customers to locate it if they misplace it. You typically print it on your business’s letterhead, so you’ll typically have this information.

Invoicing is a way to demonstrate your professionalism. We can help you to cover the whole range of what to include on an invoice.

The next section on your header is where you fill in your company’s contact information. You’ll list your mailing address, telephone number, website, email address, and the country of origin. The date you created the invoice, the date your customers requested it, and the date the invoice expires is also helpful.

Customer Contact Information 

In order to help keep all of your invoices separate and easy to find, it should include your customer’s name or business name along with their contact information. List their mail address, company name, phone number, and company email address very clearly on your invoice.

Invoice Dates and Number 

Each invoice you send out should have a unique number because you’ll reference it in your business’s accounting information, and the customer will also use it in their accounting system. While you can start anywhere you’d like and use any numbers you like, they should be sequential. This means that if this invoice’s number is “Invoice #00112,” the next invoice you send out should be “Invoice #00113” to keep things organized.

You’ll take these unique numbers and use them in a tracking system. When you pull the unique number, you should instantly be able to tell which customer you sent the invoice to, the date you sent the invoice, and when the customer’s due date is.

Reason for Exporting Your Goods 

If your business exports goods, you have to explain on the invoice why you’re exporting them in the first place. You should note whether or not the items in question are a sample, a sale, a return, a repair, or a gift. If it’s a temporary export due to repairs and it’s going to come back to you, you can put that it’s a “temporary export.”
Shipping Information 

How do you plan to ship your goods to your customer? How many packages are there, and what do they all weigh? You should have this clearly listed on your invoice. 

Itemized Charge List 

Arguably one of the most important features on your proforma invoice sample is your itemized list of charges. This is where you have to be as specific as you possibly can because not being clear enough on this section is a huge reason many customers reject the invoice. The more specific and detailed you are, the less likely it is that a buyer will go with someone else. At the very least, you should include:

  • Each good or service has its own line
  • A detailed description that outlines what you’re selling or providing
  • Number of units you plan to include
  • Price point per unit of every individual item on your list
  • Total cost

Shipping, Tax, and Total 

You want to double check any tax laws to help you calculate the correct sales tax for your shipment. You also want to add any necessary shipping and handling charges. If you’re exporting to another country, this includes any duties that customs levies. This should be clearly shown on a single line. Add it together and put it on your total line. If you don’t, you could be liable for hundreds of excess dollars in customs fees, shipping, or taxes.

Footer 

The final part of your invoice is the footer. This is at the very bottom of your invoice, and it’s where you can include any miscellaneous information. You can use it to outline your return policy or your guarantee. Also, it’s a good idea to put a short thank you in here for your customer because a little courtesy on your part can go a long way.

Ways to Create Your Proforma Invoice

You can use Google invoice maker to pull free pro forma invoice templates. They usually come with areas that you can quickly and easily edit and fill in to create customized invoices to send to your clients.

Many companies offer printable invoice templates that you can download, print off, and fill in the relevant information. This is more time-consuming to do, and you either have to mail it out to your customer or scan it into your computer before you send them an email.

Creating a Pro Forma Invoice with Billdu

At Billdu, we make it quick and easy to create an invoice online and track your invoices. We have filters in place on your dashboard that allow you to see all of your paid, unpaid, and overdue pro forma documents. We’re going to give you a step by step tutorial on how to create your invoice sample below to show you how user-friendly our platform is.

Later on try our trial how to create invoices online.

Step One – Create an Account

The first thing you have to do is go to Billdu.com and click the “Login” button on the upper right corner. This will open a new tab where you can click “create account.”
Create Billdu account to create proforma invoices

When you hit create account, you’ll enter your business name, email, and password before clicking “Create account” to finalize it. It’ll log you in and show you your dashboard. Now you can move to step two. 

Billdu Dashboard - Start creating pro forma invoices

Step Two – Complete Your Business Profile

Before you can create any invoices, Billdu will prompt you to create your business profile, and you can open it by clicking the “Let’s Do This” button below the “Please complete your business profile first” box. Once you click it, a screen will open and ask you to fill in: your business name, country, street, zip code, city, and your province/state. The second section is where you choose whether you not you want to have taxes or no taxes on your invoices, along with your business’s tax registration number.

You should also fill in your contact information with your name, email, phone number, fax number, and website. You can upload your signature and your business logo as well.

Complete your business profile before creating pro forma invoices

Step Three – Complete Your Payment Profile

Once you fill in your business profile, there’s a second tab you can open that allows you to fill in your payment information. You’ll fill in your account holder’s name, bank name, routing number, account number, whether or not you want to set up online payments and link directly to your bank account, and a PayPal email address if it’s relevant. Once you finish, click save.

Complete your payment details profile before creating pro forma invoices

Step Four – Set Up Your Proforma Invoice

At this point, you can either stay on your dashboard and customize your branding with your chosen free invoice sample, color choices, and layout, or you can make your proforma invoice. For this tutorial, we’re going to go straight to the invoice. To get there, select the “Documents” tab on the upper left side of the screen. A drop-down menu will open, and you can pick the correct invoice format. In this case, it would be the pro forma invoice. When you click it, a template will show up.

Dashboard-Create your own proforma invoice template

Step Five – Fill in Your Invoice

You start by clicking the blue “New pro forma invoice” button on the upper middle portion of your screen. When you click it, you’ll see:

Dashboard-Create a new proforma invoice

If you don’t have any client lists loaded in, you’ll click the + button to create a new client listing. A small box will open when you do this, and you’ll have to fill in the billing name, country, street, zip code, city, state/province, tax reg number (optional), email, contact, phone number, website, and fax number (optional). When you fill this in, click save.

Add a new client details for the pro forma invoices

You’ll continue to fill in your invoice once you populate the client information. It’ll populate a pro forma number of 001, but you can change this. You’ll add the invoice issue date, due date, and a reference.

There’s a “More Items” option you can click that reveals a few more boxes you can populate. This includes the payment method, and you choose the way your customer is paying from the drop-down menu, which currency they want to use, and the language. The next portion to fill in is your item, the quantity, price, and any taxes. Once you get everything in, you can hit the save button.

Dashboard-Add all the items to a proforma invoice for your client

Step Six – Double Check Your Invoice and Send It

Once you hit the save button, your invoice will open on your dashboard. This is where you double check that everything is correct and good to go. You’re now ready to download your pro forma invoice as a PDF file, email it out, or keep it and add payments as they come in.

Printable invoice template example

Your dashboard will automatically help you keep track of all of your pro forma invoices, and it’s easy to tell at a glance whether or not they’re overdue, paid, or unpaid.

Dashboard-Track your proforma invoices statuses

Start creating your proforma invoices with Billdu

Try Billdu today to start creating professional pro forma invoices and tracking them via our user-friendly online dashboard and mobile apps. You can register for a free trial below.

Start for free

Looking for Downloadable Invoice Templates?

We have them ready for you, select your format and get your invoice template now


There are several ways you can create an invoice for your customers. You have the more traditional way of writing them out by hand, or you can utilize invoice software and free templates to generate them and get them sent out. If you’re curious about the different invoice methods, we’re going to outline several different types below. This way, you’ll be able to decide which one will work best for your business and incorporate it into your systems.

Traditional Ways for Creating Invoices

There are two main traditional ways to create invoices for your customers and vendors. Many older business owners use these methods because it’s familiar to them. They’re rare today because many invoice creator software are so user-friendly, but you can find them now and again.

Manually Input Your Data

You can work off one set template and manually input all of your data. It can be a hard copy or on a simple template that you type out and print. You have to put all of your items into your products or services in one by one, list the costs, and total it all up at the bottom of the template.

While there is a slightly lower risk of errors because you’re checking everything as you put it in, it can be a time-consuming process. It’s also slightly impractical for larger businesses that process hundreds of invoices each day.

How to create an invoice - pen and paper invoices

Pen and Paper

Believe it or not, some people still prefer to write out their invoices with traditional pen and paper. You can get paper books that come with a basic invoice template, and you simply fill in the relevant information with each customer. They usually have lines where you can list your products or services and the quantity.

You’ll also list the prices in the correct area with an overall total at the bottom plus any taxes you charge. These invoice books can come with the business name, address, and phone number as well. Again, they’re time-consuming to fill out, but you reduce your risk of errors.

Electronic Ways for Creating Invoices

Technology has come a long way in all areas, and this includes offering free invoice software and downloadable free invoice templates. Many large and small businesses made the switch to electronic invoice creation because it saves time, and you can usually automatically populate your fields and send them out through email.

Template with a Text Editor

One of the most simple electronic ways to create invoices involves getting one or two templates and opening them in your preferred text editor. There are fields that allow you to input your items, services, quantities, and the total cost. You can customize these templates to display your business’s name, address, phone number, email, and any other relevant information.

Since it’s electronic, it also opens the door for email delivery, or you can print it out and hand it directly to your customer or vendor. It helps your business to project a sleek and current image.

Using spreadsheet templates to create invoices for free

Spreadsheet Invoice Template

Spreadsheet invoice templates are very popular with both large and small businesses alike that send out several invoices every day. You can build your own invoice template in Excel, or you can choose a free template and import it into your spreadsheet program.

Once you get all of your business’s information in and saved, you can use the same template over and over again. All you have to do is populate the fields with a description of your products or services, the quantity, price, and the final amount in a total column. They’re straightforward, fast, and they give you a uniform look.

Accounting Software

Depending on the accounting software you use, they can automatically generate invoices with everything populated into the correct fields when your accounting team works on your business’s books.

Businesses like this type of software because it can show them in real-time how their budget is, how high their expenses are, and how much money they have coming in and going out with each invoice. It can also help you keep track of multiple invoices for different customers or vendors at the same time, and it reduces the chances of errors because your team looks them all over.

Simple Online Invoice Generator

Simple and interactive online invoice generators are gaining popularity very quickly. They let you choose your language of choice, currency, date format, tax labels, color, and the template you’d like to use. You can add your supplier and customer information with a few quick clicks, and they have the issue date, due date, and a numbering system to help you keep track of multiple invoices at once.

You can also find invoice generators that let you add notes and greetings, set reminders, and accept credit card payments. They come designed to be very user-friendly and comprehensive, and this can help you get your money quicker.

[dt_gap height=”15″ /]
Create invoices using Invoice management app

[dt_gap height=”10″ /]

Invoice Management App

Finally, we have invoice management apps. Gone are the days of struggling to make your invoices, send them out, keep them all organized, and double check that you get payments on all of them. Instead, businesses now have the option of choosing invoice management apps like Billdu to take care of the hard work for them.

This app lets you create and send invoices with a few clicks, know when your clients see your invoices, set payment reminders, and give your customers the opportunity to pay right away. There’s also a mobile invoice app that lets you manage and keep track of your invoices when you’re on the go. Nevertheless, using an invoice app such as Billdu can automate the creation of recurring invoices, saving you a lot of time and hassle.

Comparing Traditional vs. Electronic Invoice Systems

Now that we’ve outlined the seven most popular ways businesses create free invoices, we want to make a quick comparison of the traditional vs. electronic invoicing systems. If you don’t have a system in place, this can help you decide which one is a more viable option for your business to use.

Storage Space

It’s far cheaper and easier to store electronic invoices over paper invoices. All you need to store your electronic invoices is a computer system. Paper invoices require file cabinets and constant upkeep to keep them neat. Most electronic systems automatically have organizational settings you can use to search for your invoices by name or number without having to try and go through hundreds of papers one by one.

Ease of Use

Sharing and finding paper invoices can be a time-consuming process. If your customer isn’t at your business and they request a copy, you either have to mail it out or scan it in, attach it to an email, and send it off. With electronic systems, it’s usually a few clicks of a button to bring up the invoice and get it on the way to the customer. You can also share them between computer systems almost instantly.

Labor Costs

You have to have staff in place to help manage your paper invoices. Your staff has to correctly file, collate, match information, staple check stubs or money order copies to the invoices, pull them when there is a new payment, and keep track of old invoices. With electronic systems, the software usually does this for you, and it uses a fraction of the labor that you’d use with a paper system.

Locating Time

It’s very easy to misplace, misfile, or outright lose paper invoices. This can result in hours of fruitless searching if you have to pull them up for any reason, and losing an invoice is paramount to the work or service never making it to the client if they choose to dispute it. Electronic documents usually with come with some ability to search for them. You can search by invoice number, customer, date range, and more.

Portability

How easy is it to pick up your laptop or even your phone and take it with you? If you have an app linked to your record system, being able to view your invoices is as easy as pulling out your phone. Paper invoices mean that you have to store and transport boxes or folders of invoices each time you move, and electronic invoices are much more portable for everyone involved.

Change Tracking

Maybe you want to see who made changes or updated your invoices. Unless they sign or initial the paper invoices, you have almost no way of knowing. This is especially true if you have a large department that works on the invoices. Many electronic invoices let you track the different versions, and everyone has a unique identifier that allows you to easily see who made what changes to your invoices.

Reliability

One of the problems with electronic invoices is reliability. If your network should crash, or should you get somewhere that you don’t have access to a computer or phone, you can’t get to your records. If there’s a massive power outage, your information is out of reach. Paper invoices are reliable. You can store them on or off-site, and you always have access to them as long as you can get to where you store them, whether or not you have power.

Accidental Deletion or Theft

Unfortunately, software makes it very easy to accidentally delete large batches of data all in one go. If you don’t have backups or copies stored somewhere, you can quickly be out months of invoices. It’s harder to accidentally toss out months or years of paper documents. Also, it’s more difficult to steal large amounts of paper documents without someone knowing. You can hide thousands of digital documents on a small USB.

Electronic invoice systems pros and cons

Pros and Cons of Electronic Invoice Systems

Online invoices come with pros and cons, and you want to get a clear picture of the biggest ones because it can be a big change to switch from traditional invoicing to using free invoice software to create your invoices.

Pros of Electronic Invoicing

  1. Convenience– There is a huge convenience factor with using electronic invoices for both the person sending the invoice and the person receiving the invoice. They can have it in their email in minutes, and you can offer multiple ways to instantly pay in full or a portion.
  2. Greater Control for Finances – If you accidentally forget to pay an invoice, you’d normally end up paying late fees. However, even if you’re a day before your invoice is due, you can submit an electronic payment that can potentially process by the next day.
  3. Automatic Reminders– Invoice creators allow you to set automatic reminders if your customers don’t may a payment or pay your invoice in full by the due date. These automatic reminders mean you don’t have to spend as much time chasing after your customers.
  4. Reduces Overhead – Once you get an electronic invoice system in place, you can lower your costs spent with postage and printing. You won’t use as much ink because you send the invoices straight to email.

Cons of Electronic Invoicing

  1. Conversion Cost – Depending on the system you choose, it can be very expensive upfront to convert all of your paper invoices to electronic. A way around this would be leaving your paper invoices in their original state and just do electronic invoices going forward.
  2. Software Compatibility –Not all software or computer systems are compatible. This means that you’ll either have to find an alternative system to use, or you’ll have to upgrade everything.
  3. Formatting Risks– Not all template formats are compatible, and this means that you may not be able to open them at some point. Currently, Adobe Acrobat (PDF) one of the preferred formats, but if it were to vanish, you wouldn’t be able to open or view your invoices.
  4. Quality Control – In a perfect world, all of your invoices would be extremely high-quality, have a nice balance, and be very easy to read. However, it can be difficult to maintain this higher quality across all of your electronic invoices.

Try Billdu and Creating Invoices Today for Free!

Are you ready to create professional and sleek free invoices? Maybe you’re wondering how to create invoices that can be stored, reused and automatically aggregated. Either way, we want to help! Try our free invoice generator to start or register for a free trial to get the access to the full Billdu invoice maker features.

Use all features of Billdu invoicing apps

Try Billdu today to start creating professional invoices and generating live reports using our friendly online dashboard and mobile apps. You can register for a free trial below.

Start for free

Looking for Downloadable Invoice Templates?

We have them ready for you, select your format and get your invoice template now

Barcode scanners — they’re such a simple device. Yet, they can be invaluable for business owners. They provide invaluable information about a business’s assets, inventory and other investments at the different stages in the supply chain.

When you combine this with the fact that almost everyone has a smartphone, it’s easier than it ever was before for business owners to take advantage of an item scanner app without paying a lot upfront. There are several benefits of having barcode scanner for Android and a barcode scanner for iPhone, and we’re going to outline them below.

Understanding Barcodes

Having and using a barcode scanner online isn’t useful unless you understand how to use these barcodes to increase your business’s efficiency and reduce your costs. Simply put, a barcode is a pattern that represents encoded information for a product. Traditional barcodes are the black and white spaces and lines that have been popular since the 1970s.

2D barcodes have become more popular in recent years. They’re able to contain more information than a traditional barcode. A traditional barcode usually has a serial number that directly corresponds with information stored in a central database. This information typically includes how many you have left in your inventory and the price. 2D codes provide you this information as well, but they can also provide pictures of the items for your reference.

You can’t tell these patterns apart with the human eye, and you need an item scanner to correctly read them and translate them into something that makes sense to you. One of the biggest benefits of the inventory scanner app is that it significantly reduces the time you need to manually input each item’s unique serial number. Also, the margin for error is extremely small with barcode scanners when you compare it to manual input.

How to Use Your Smartphone as a Barcode and QR Code Scanner

The first thing you have to do is download Billdu’s item scanner app to your iPhone or Android device. You have to understand that it’s not the smartphone’s operating system that lets you integrate it into your business’s barcode system, but it’s the smartphone’s wireless capabilities and Bluetooth.

The original barcode scanning systems required that you had a wired connection that went from the computer system to the scanner itself. Today, a smartphone that uses an inventory scanner app can simply use Bluetooth to connect to their computer and transmit the relevant data from a reasonable distance. Billdu app does not use Bluetooth nor transfers the data directly to your computer, they are safely saved in your device and synced to your online account.

Billdu barcode and QR code scanner saves you time when adding items to your invoice. If you have the products physically with you and you are creating the invoice while packing them to be dispatched, you can easily scan their barcodes to add them to your invoice in seconds. To be able to do that, your products need to be in your inventory first. To add new product into the inventory, go to your Billdu app and click the ‘+’ icon to add new item. There you can add all relevant information about your product like the name, unit price and quantity. One of the parameters is the ‘Item code’. Here you enter the number from the barcode/QR code. From now on, while adding new product to your invoice, you can simply tap on the barcode icon. This opens the inbuilt Barcode and QR Code Scanner feature – you aim your phone at the barcode/QR Code on your product, and it’ll seamlessly scan it in. Based on the code read, it selects the matching product from your inventory and adds it to the invoice. You can always manually change the parameters of this product on the invoice and/or look up another item (Btw – have you already read the article about creating invoices on the go with Billdu?).

Billdu Barcode and QR code scanner app for inventory management and invoicing

Why Use an Inventory Scanner App

Barcode scanners with online cameras are popular with businesses of all sizes because they provide accurate, fast, cost-effective, and easy to implement tracking methods. Every step of the supply chain can benefit from an inventory scanner app, and we’ve rounded up the top reasons why you want to implement this technology into your own business. They include:

1. Removes the Bulky Equipment

Traditional barcode scanners were larger and bulkier pieces of equipment. You had to attach them to your belt or sling them over your shoulder in a special harness. Today, this equipment is quickly becoming obsolete. Instead, you can download a barcode scanner for iPhone or a barcode scanner for Android. Sticking your smartphone into your pocket and pulling it out when you need a barcode scanner with an online camera is much easier than using the more traditional equipment.

2. Turns Any Smartphone Into a Scanner

Before, you had to invest in expensive scanning equipment that increased your upfront costs, and you had to spend more to train your employees to use it. Inventory scanner apps allow you to quickly and easily turn any smartphone into a handheld scanner that can read barcodes. You can either supply your employees company-issued devices to do this, or they can simply download the app and use it on their own smartphone.

3. Eliminates Expensive Repair Costs

If your traditional scanning equipment breaks down, you have to send it away and spend money to repair it. Since there is no equipment with an app, it eliminates these repair costs. This is especially important if you’re a larger business who had several of these scanning devices on-hand because the repair costs can quickly add up, and it also costs you because you had fewer scanners for your employees to use.

4. Integrates with Existing Software

You most likely already use software to track your inventory and keep count of everything you have in stock. An inventory scanner app can seamlessly integrate with your existing software, and this helps you ensure that your numbers stay current and accurate. This provides a seamless transition from the traditional barcode scanning units to your new barcode scanning app.

5. Stores Everything in a Secured Server

When you use the Billdu item scanner app, all of your business’s data goes to a secure server. This secured server makes it more difficult for any outside sources to get into your sensitive data. Additionally, you have one centralized location for all of your data to store to, and this location gives all of your different item scanners quick and easy access to it. This also allows for more consistent monitoring across the server while ensuring that everything you have is accurate.

6. Allows for Electronic Signatures

Sometimes, you want someone to sign off on an inventory transaction. This could be an employee or a customer. Billdu’s item scanner app lets you capture their signature right on your smartphone. You can then generate an invoice with said signature right away and email it to the relevant parties. This can help you streamline your transactions, and it can also save you time.

7. Optimizes Workflows

You never want to be short on items, and you never want to have a huge excess sitting around and taking up valuable space. An item scanner helps you keep an accurate count of your inventory products to optimize your workflows. You won’t have to worry about having errors or misplaced inventory with a barcode scanner. Instead, you’ll get accurate numbers that let you know exactly when you need to order more, and this can optimize how you do business.

Code scanning apps for inventory management and invoice generation

Advantages of Using a Barcode/QR Code Scanner

There are several reasons why you’d want to use a barcode/QR code scanner for your business. We’ve rounded up the top ones for you if you’re not sure whether or not this is a good investment for your business. They include but are not limited to:

Saves Time

Before, inventory used to involve a lot of hands-on work combined with a lot of number crunching. This didn’t take into account the facts that it had a high margin for error and it was tedious.

Using barcode and/or QR code scanners require a fraction of your employees, and it makes the entire inventory process fast and easy. Instead of having to input everything by hand, your barcode/QR code has all of the relevant information. You scan the barcode or the QR code and the computer reads it for you.

Boosts Efficiency

Humans can make errors when they track items or record information like expenses and inventory counts. Additionally, if a person wanted to find out the history of a specific item in their inventory, they’d have to dig until they found the correct paper. An item scanner gives you everything you need to know about a particular item within seconds. All you have to do is scan the specific code, and it’ll give you a current readout.

Reduces Mistakes

So many clerical errors can be traced back to human error. Errors can cause a ripple effect for problems for your business like missed shipments, additional costs and an overabundance of inventory. In smaller businesses, clerical errors can be extremely costly to correct, and it can have lasting impacts. Barcode/QR code scanners remove a lot of the potential for human error with fewer mistakes overall.

Smooths Out Internal Operations

Every business has a system of checks and balances in place to ensure that all of their employees follow the set rules. Business owners have to account for each of their assets to the IRS. Putting barcodes or QR codes on all of these assets allow business owners to seamlessly track and keep accurate counts at all times. In turn, this allows business owners to smooth out their internal operations all year round.

Gives Better Control over Inventory 

Using barcodes and/or QR codes makes it possible for businesses to track their inventory down to precisio[dt_gap height=”10″ /]n levels. In turn, they can ensure that they don’t over-order and end up with a large excess due to a miscount. In turn, this reduces the business’s overhead.

Business owners can also use barcodes to track equipment locations, and this lowers the amount of time people spend looking for it. Additionally, it also reduces the amount of money they spend replacing items that they considered lost.

Billdu Barcode scanner app and QR code scanner app for Android and iPhone

Reduces Training for New Employees 

For most employees, it’ll take a few minutes to learn how to work an item scanner. Also, new employees won’t have to worry about learning everything there is about a business’s pricing procedure or the entire inventory.

In turn, it works to reduce the amount of money a business spends on training. Business owners won’t have to pay an employee to train the new employees, and they don’t have to get paid extra for additional training time.

Increases Versatility 

You can use product codes and barcode/QR code scanners for any type of data collection you may have. This can include more traditional uses like inventory information or pricing. However, you can also attach your product codes to any surface. This means that you can use barcodes/QR codes and your scanner system to track more than the products themselves. They’re also useful for tracking equipment and outgoing shipments.

Billdu Has a Barcode/QR Code Scanner Available

A picture tells more than a thousand words. Check out how the Billdu App manages the inventory items and their adding to the invoice thanks to the inbuilt barcode and QR code scanner functionality.

At Billdu, we take great pride in designing devices and apps for our customers, and we have a barcode/QR code scanner with an online camera available. This inventory scanner app comes designed to streamline your processes and boost your productivity.

With just the tap of a button, you can turn your smartphone into a barcode and QR code scanner. Once you open the app, you can input your product’s name, the quantity, and the unit price. When you input all of this data, you can tap the barcode icon and go to a screen that looks like your smartphone’s camera screen. It’ll capture your item’s code and automatically populate it. Billdu’s inbuilt code scanner also works with both barcodes and QR codes. If your item code is encoded into a QR code, Billdu will easily read it.

The code number is automatically saved to your product, and you can quickly and easily add it to your invoice. To do this, you go to your Documents screen and pick out the client you want to invoice. Next, you fill in the date range, currency, discounts, and payment methods. You can now tap the barcode icon to quickly and easily populate the items for your invoice. On top of using Billdu’s barcode/QR code scanner to add items to your invoices, you can use it in your quote maker, too. Adding an item to your new quote/estimate in Billdu works just as adding an invoice item. When you create new quote, you click on ‘Add item’ and then you either manually look up the item in your inventory or click the code scanner icon to scan the item code.

You’ll be able to create professional quotes and send out custom invoices in just a few minutes, and this helps you quickly and easily streamline your operations. Each invoice will have a notification for when your customer opens it and reads it, along with who reads it. You can also add an instant “Pay Now” button right on your invoice for fast and easy payments. Finally, the user-friendly dashboard allows you to get an instant overview of both paid an unpaid invoices.

Use Billdu invoice maker with inbuilt code scanner

Try Billdu today to start creating professional invoices and manage your inventory easier than ever before thanks to the built-in item scanner app. Register for a free trial below.

Start for free

Looking for Downloadable Invoice Templates?

We have them ready for you, select your format and get your invoice template now

Many individuals and businesses use a receipt scanner app to keep track of all of their documents to keep their finances in order. Storing paper receipts can quickly get disorganized and overwhelming. Even worse, trying to find one specific receipt can be an extremely time-consuming and frustrating process.

This is why many businesses are turning to storing receipts in a digital format. You can easily organize and store these receipts in your computer or in cloud software, and then you can recall them any time you need in a fast and efficient manner.

Whether you choose to buy the best receipt scanner possible, make receipts through an app, or get a bill organizer app, converting your paper receipts to a digital format for storage can streamline your processes. This will help you avoid a lot of hassle going forward.

The Top Six Advantages of a Receipt Organizer

While there are arguably hundreds of benefits of using a receipt scanner, we’ve picked out the more important ones and summarized them below. If you’re on the fence about converting to smart receipts, the following advantages can help you make an informed decision.

Purchase Tracking

When a customer purchases one of your products or services, they usually hang on to the receipt as proof that they purchased the item. It can also help them be sure of the warranty on your item. If the person bought your services or items and they didn’t fill out the warranty information at the time of purchase, they would need to show a receipt to prove the exact date they purchased your product or service.

Holding onto a receipt for a few months can be a challenge, let alone for an extended warranty period of a few years. However, having a digital record of the purchase stored in your computer or cloud software makes locating the receipt much faster. If a vendor you worked with claimed that you never paid for products from them, pulling up a digital receipt can save you time and money.

[dt_gap height=”10″ /]

Be smart with your mobile receipt scanner app

[dt_gap height=”20″ /]

Business Expense Tracking

Businesses who have staff that do a lot of traveling must keep track and record every single expense they incur in order for a company to reimburse them. If you have a lot of staff who travel, trying to keep multiple receipts for different people in order can be almost impossible. This is especially true every trip brings multiple receipts. If your staff gives you the receipt and you misplace it, you could have incorrect numbers in accounting.

When you scan receipts, you can quickly and easily organize them by employee, trip, date, or expense type. You can even give your employees an app to scan receipts in iPhones or Android devices. This way, they can scan the receipts as soon as they have them, and it can go to your documents. It reduces the risk for losing receipts as they travel, and it helps to ensure accuracy in accounting.

Being Prepared for Annual Taxes

No matter how small or large your business is, you have to keep track of all of your receipts so you can do your annual taxes. This is critically important for anyone who runs their own business or who is self-employed. Your receipts are what you use to track your expenses, and these expenses can go toward your deductions to help reduce your tax bill. If you have paper receipts and wait until taxes are due to organize them, you can quickly get overwhelmed.

A receipt scanner app allows you to scan your receipts as soon as you get them all year round. You can also organize them whenever you like during the year, and this can make tax time a little less painful for you. Also, you’re supposed to hang onto everything for at least seven years in the event that you get audited. This can result in thousands of paper receipts, but a digital format is much easier to store and track over the years.

Create Expense Reports

Your expense reports allow you to monitor the money you have going out and coming into your business. They’re also something your business’s board or investors can look at to see how healthy your business is doing throughout the year. Expense reports are vital for any business, and trying to create them by having hundreds of receipts floating around can be almost impossible.

Scanning receipts into Android or iPhone devices let you use Billdu’s dashboard to create expense reports with a few simple clicks once you scan your receipts. Creating on-demand expense reports is great if you have a last-minute meeting or request for them, or if you’re busy and you need to create an annual expense report with limited time to dedicate to it.

[dt_gap height=”10″ /]

Bill scanner and organizer app

[dt_gap height=”20″ /]

Reduce Costs

As a business owner, any way you can cut your costs and reduce your business’s overhead is something to check into. Printing receipts requires you to have hardware, software, paper products, toner or ink, and more. Additionally, there are maintenance fees that come with ensuring that these things keep running well. These can quickly add up if you have repeated issues with either your hardware or software.

A receipt scanner app reduces the need to have any of these items on-hand. In turn, you can take this money that you save and reinvest it into your business in areas where you could use it. Whether this is new products, services, supplies, or staff training expenses, you have dozens of ways to use the money this receipt scan app frees up for you.

Opens Email Opportunities

A receipt organizer allows you to send digital copies of your receipts to your customers, and this opens up a whole new marketing opportunity. Because your customer is expecting the receipt and it’s important to them, you know that they won’t ignore it like they might if you sent them anything else.

You can take a few minutes to use the email with the receipt to express your gratitude that the customer chose your products or services. Emails are a great way to inform customers of any new developments on the horizon, attach promotions or coupons, or just make them feel appreciated. In turn, they’re more apt to remember your brand and utilize your services or products the next time they shop.

Why Billdu Offers the Best Receipt Scanner

Billdu offers a bill organizer app that allows you to scan receipts to Android or iPhones quickly and easily. They’ve spent years creating and streamlining their app to offer their clients several exclusive features all in one convenient place. You can scan receipts and store receipts with the app, and a few other features include but are not limited to:

  1. Dashboard – Billdu’s receipt scanner gives you immediate access to a user-friendly dashboard that is easy to use and understand. You’ll be able to get an instantaneous overview of your business’s finances including expenses, any unpaid invoices, and your company’s current balances.
  2. Inventory Tracker – Keeping enough of your items in stock and being able to scale back your ordering in slower seasons can go a long way to ensuring your business’s financial health. The app allows you to keep an eye on your inventory in real time, stock, manage, and order items, and add them to your receipts.
  3. Client Signature – Getting your clients to sign for all of their orders ensures that you don’t have the hassle of chargebacks. You can use Billdu to have your client use their finger and sign directly on the receipt on your phone. This also eliminates the need to carry around a signature pad with you everywhere you go.
  4. Direct Link to Your Accountant– Accounting errors can cost a business thousands of dollars, and there is an increased risk for error if you don’t have a direct link to your accountant. Billdu gives you and your accountant a constant link to share all of your business’s receipts. This decreases your risk for lost paperwork and other errors.
  5. Purchase Orders – Each time you purchase an item, you’ll get a receipt for your purchase. You’re able to organize and file these purchase orders in your app, and it also helps you track all of the purchases your business receives. This will keep you organized come tax time each year.
  6. Quick Payments– You want to give your clients quick ways to get their payments and get their receipts. Billdu offers the ability to add a “Pay Now” button on each invoice you send to your clients. In turn, they can instantly make payments and you both get a copy of the receipts for your records.
  7. Record Keeping– Keeping precise and accurate records is one thing every business owner needs to measure their financial health, balance their revenue and expenses, and manage their spending. The receipt scanner gives you exact measurements of all of your expenses, and you can compile them into a comprehensive report.

Easy receipt scanning through mobile phone

On top of that, your Billdu app will get you many more features including an invoice maker with a variety of modern invoice templates to choose from. You get an invoice maker app that runs on iPhone and Android, as well as online in your web browser. Billdu is also a professional quote maker – you can quickly generate grea looking proposal and send them to your prospective and existing clients. Everything in the Billdu app which is extremely easy to use.

Frequently Asked Questions About Billdu’s Smart Receipts

Our customers frequently ask several questions, and we wanted to round them up and put them all in one spot so you had an easy time finding them. This way, you don’t have to wait for one of our representatives to get back to you to get all of your most frequently asked questions answered.

1. Is Billdu’s receipt scanner difficult to use?

No! We made the entire app and dashboard a very user-friendly tool that can benefit business owners of all ages. You just snap a picture of your receipt, and your receipt goes to your dashboard. You can then organize this receipt any way you’d like quickly and easily. Also, we made the recall process easier too.

2. Are there different pricing packages available?

Yes! We understand that one size may not fit all, and this is why we have several pricing packages available. They start at just $1.99 per month for a single user and go up to $14.99 a month for our Premium package. No matter what size your business is, you can tailor a pricing package to suit your needs.

3. Do you need an internet connection to print your receipt?

With Billdu, you’re able to send receipts, send invoices, orders, and estimates without an internet connection. This is helpful when you’re working during an outage or somewhere where you don’t have reliable internet but still need to get your work finished.

4. Can you put receipts into categories when you scan them?

Not only can you make receipts with this app, but you can easily categorize all of them as soon as you snap a picture of them. You can create clear categories for all of your receipts, and this helps you keep everything organized. In turn, it’s easy to have everything you need when you create reports and file your taxes.

5. Does the app generate invoices?

Yes! As soon as your customer places an order for your business, the app will automatically generate an invoice. You can look this over and send it with a tap of a button. You can use these invoices and your receipts to help create your expense reports. Use your invoices on the go with Billdu iPhone and Android apps.

6. Do you get access to Billdu anytime you need it?

Since you can scan receipts on iPhone and scan receipts on Android, you can get access to your Billdu account any time you have your smartphone on hand. All you have to do is register your account, download the app, and log in. You’ll get your dashboard and everything that comes with it. Also, it also gives you direct access to your accountant, and you can have more than one business on a single app.

Start Using Billdu Receipt Scanner App Today!

Are you ready to get the best receipt scanner for your business? Get started today – register for a free trial below and start scanning your bills with our app straight away.

Start for free

Looking for Downloadable Invoice Templates?

We have them ready for you, select your format and get your invoice template now


Whatever type of business you run, it makes sense to keep a small supply of cash in the office to deal with the little expenses every business incurs. Known as petty cash, this small fund is often more essential for the smooth running of your business than you might think. However, these cash expenses can very quickly get out of hand if you do not manage them properly. Like all other aspects of your finances, you need to stay on top of your petty cash if you want to remain in control of your spending.

Here’s everything you need to know about petty cash, and the best ways to track your cash expenses to keep them under control.

What is petty cash?

Petty cash is a small cash fund which is kept in your workplace, usually in a locked box, drawer or safe, from where it should never be moved. Your petty cash fund can be anything from $30 to $300 or more, depending on the size and needs of your business, but it is only used for miscellaneous, small purchases which need to be made quickly, saving you the trouble of using your company credit card in instances where it is easier to use cash.

Some examples of typical cash expenses might be:

  • Paying for a working lunch for a few colleagues
  • Reimbursing an employee for supplies they have purchased
  • Paying for a taxi to a meeting

These small expenses are regular occurrences in the day-to-day life of any business, so you will regularly find yourself thankful that petty cash is kept in the office! And there are many important advantages to your business in keeping a supply of petty cash:

  • It discourages overspending on small items, as there is only a limited amount of cash available, and people are always inclined to spend less when they actually have to hand over physical money instead of making invisible transactions such as via a credit card or smartphone;
  • It means there is always a supply of cash available for office emergencies;
  • It makes it more likely that staff will get reimbursed for supplies they pay for out of their own pockets, as they can be paid instantly instead of having to submit expense reports, which they can forget to do;
  • It makes bookkeeping easier, as it consolidates multiple purchases into one entry.

However, it is important to set up and manage your petty cash account correctly; otherwise, your finances can quickly get into a mess.

What is petty cash

How to set up a petty cash account

There are several stages to this process:

1. Establish your number of petty cash sources

The first thing to determine is how many sources of petty cash you will need. A small business is only likely to need one source of petty cash; but if you are a medium-sized enterprise with various departments or more than one site, it can make sense to have several different petty cash sources so everyone’s cash expenses can be covered quickly and easily.

2. Start your petty cash account

You will need to add a petty cash account to the assets section of your chart of accounts and decide how much money should be in your petty cash float. This will depend entirely on the size of your business and the number of cash expenses you are likely to incur.

You can start your fund by writing a check to “Petty Cash” from your company bank account, and cashing the check. The check should be for the amount you have decided you need as a float. This cash should then be placed in a locked box, drawer or safe in your office, and it should not be moved from this location.

3. Appoint your petty cash custodians

You don’t want everyone in the office to have access to the petty cash fund. Cash thefts from workplaces by employees do sadly happen, and the money will be much easier to trace if fewer people have access to it, should anything go missing. This also creates an atmosphere of less suspicion within your staff team.

Ideally, only two people should have access to the petty cash; or two in each department if you have multiple petty cash sources. One of these custodians should be responsible for replenishing the petty cash float. The other will have responsibility for entering all petty cash transactions into your bookkeeping system. In a small business, one person can take on both responsibilities, but it makes the system more secure if there are two people with separate roles.

4. Devise a company petty cash policy

At this point, it makes sense to devise a company policy for petty cash. This should be put in writing and made available to all employees, so they are clear on their rights and responsibilities. If you want to make sure your petty cash policy covers all the essential issues and is workable within employment law, you can have it checked by a legal or HR advisor before issuing it.

The policy should clearly state points such as:

  • Who can issue petty cash and what the responsibilities of these people are;
  • Which types and amounts of expenditure can be covered by petty cash, with a clear limit on the amount permissible per transaction;
  • Receipts must be provided for every cash expense before anyone can be reimbursed.

This last point is particularly important. Without receipts, it becomes impossible to track your cash expenses, so your petty cash account can fail to balance.

Balanced petty cash account

Keeping your petty cash account balanced

The first entry in your petty cash account will be a debit of the amount of your float. This amount should also be entered as a credit into your company bank account.

From here on, every amount of petty cash given out needs to be exchanged for a receipt. The amount of cash plus receipts in your petty cash box should always add up to the amount of the original float.

When the petty cash needs replenishing, all the receipts in the box need to be entered as debits in your expense accounts under their various categories, such as office supplies, refreshments or taxis, for example. Then all the receipts need to be added, and the total amount should be entered as a credit into your petty cash account.

Following this, you can cash a company check made out to “Petty Cash” for the total amount of the receipts. This will bring your float back up to its original level, and the check amounts should be entered as a debit in your petty cash account and a credit in your company bank account.

This replenishment process is an ongoing part of a successful petty cash system, and if your expenses are tracked properly, it will always balance.

Options for tracking cash expenses

The main problem with cash expenses is that they are easily forgotten about, and much harder to track than card expenditure. But if you want to keep your accounting accurate, tracking cash expenses is essential. There are several different ways in which you can do this.

1. A paper system

This is the old-fashioned way of tracking cash expenses. Every petty cash transaction is entered in a ledger, and the totals are added up by hand. Hardly anybody still uses this system, as it is so time-consuming and prone to inaccuracies due to human error. There is also the risk of your accounts getting lost or damaged, which can have a serious impact on your financial reporting and tax returns.

2. Spreadsheets

Many small businesses still use spreadsheets to track their cash expenses. Receipts and petty cash amounts are entered manually into the spreadsheet. You can then use functions and formulas, so the spreadsheet will work out the totals for you.

This is a lot easier and more accurate than a paper system, and it stores your records more securely, but it still involves a lot of manual input, which is extremely time-consuming. It also contains the risk of figures being entered inaccurately, so your petty cash can fail to balance.

3. A simple expense tracker

One of the simplest ways for small- to medium-sized businesses to keep track of their cash expenses is by using expense tracking software. This comes as a feature on some software solutions, including Billdu. Using a system like this has several advantages, as it can scan receipts, so they are automatically entered into your system, making it much easier for you to keep your petty cash balanced.

As most of these software solutions are now cloud-based, it ensures that all your cash transactions are recorded safely and securely in an organized way, so the information can easily be accessed whenever you need it.

4. Accounting software

The top accounting software packages are incredibly sophisticated these days. Programs like FreshBooks, QuickBooks, and Sage are designed for large organizations, so they can automate most of your bookkeeping processes, including the vast majority of your petty cash accounting.

However, these solutions come at a price. To access all the features you need, you usually have to pay a large amount of money every month, putting them out of the reach of most small businesses.

Tracking cash expenses

How Billdu can help you track cash expenses

Billdu is designed to make your working life easier by offering simple solutions to the issues that all businesses face. One of these is tracking cash expenses. Billdu offers a simple expense tracker, which includes a receipt scanner so that you can record your cash expenses on-the-go.

What makes Billdu super-convenient is that it is a cloud-based system, but it does not just work on a PC – it also comes with apps for Android and iOS, so you can scan receipts on your smartphone or tablet as soon as you make the transaction. These will then automatically be entered into your system. This cuts down on the chance of receipts getting lost or damaged, and also makes it much easier to work out your cash expense totals, keeping all the information you need highly organized in the cloud.

In addition, Billdu is specifically designed to meet the needs of small- to medium-sized businesses like yours. We keep our prices as low as possible, starting from just $1.99 per month, so even the smallest start-up can enjoy many of the features offered by the much more expensive market leaders.

With a whole host of other innovative features to make running your business easier, as well as our intuitive and user-friendly expense tracker, it’s worth giving Billdu a try to see just how much it can help you out daily. Click the button below to start your FREE trial and discover the many features of Billdu for yourself!

Start tracking your cash expenses with Billdu

Try Billdu today to start creating professional invoices and tracking your expenses via our user-friendly online dashboard and mobile apps. You can register for a free trial below.

Start for free

Looking for Downloadable Invoice Templates?

We have them ready for you, select your format and get your invoice template now


Whatever kind of business you run, invoicing is an essential part of your ability to make money and to create a good professional image. But it can be a confusing process, especially if you are just starting out in business, whether you are running a small to medium-sized enterprise or setting yourself up as a sole trader. Without knowing how to send proper, professional invoices, it can be difficult to get paid for your services in a timely manner.

We’ve put together this guide to help you learn everything you need to know about invoicing and why a template for invoices can be one of the most useful items your business can have.

What is an invoice?

An invoice is an important financial document that gives all the details about a specific transaction between you and a client. It lets your client know how much money they owe you and details the goods and/or services they are paying for.

Your invoice also tells your client how you expect to be paid, such as by bank transfer or PayPal, for example, and gives them details of how they can make that payment. In addition, it shows them the date you expect payment by, enabling you to keep your books balanced and stay on top of late payments.

An invoice also serves some other extremely important purposes. It provides a record for you and your client, which you will both need to use in your bookkeeping. For you, it serves as proof of the work you have done and the amount you charged for it. For your client, it details the products or services they bought, and how much they paid for them. This information is essential for your tax returns.

This is a lot to expect from one small document. So how can it be done? By including all the right information on your invoice.

What information needs to be included in an invoice template?

Components of invoice templates

[dt_gap height=”10″ /]

There are a number of important pieces of information that business invoice templates need to include so the invoice serves all the right purposes for you and your customer:

1. The word “Invoice”

This may sound obvious but the word “Invoice” needs to be displayed prominently at or near the top of the document. If you forget to include it, your client may not realize the document is important so it could be put aside and forgotten.

2. Your contact details

Your invoice needs to include the name, address and phone number of your business. These show the client which company the invoice is from and also give them a way to contact you in case they need to ask anything about the invoice.

3. A unique reference number

Giving each invoice a unique reference number makes your invoices much easier to track. It also makes it clear which invoice the customer is referring to if they have a query or are making a payment. Unique reference numbers are usually allocated in numerical order. They can also include a code specific to that particular client.

4. Your client’s contact details

Your invoice should include the name, address and phone number of your client. This makes it easy for you to identify which customer is making the payment. It also gives you their details instantly if you need to chase a late payment.

5. The date the invoice was issued

This shows the customer when the purchase was made and how long they have to pay the invoice.

6. The payment due date

Most businesses offer the client a grace period of seven, 14 or 28 days to make the payment, starting from the issue date of the invoice. Once this period has expired, the payment becomes late. You need to include the due date so you know when to start chasing payments.

7. The amount of money due

Your invoice needs to state clearly the total amount owed to you by the client to avoid any confusion.

8. A breakdown of what the invoice is for

Your invoice needs to include details of exactly what the client is paying you for. This could be a single item, such as a laptop, for example. If you use Billdu invoice maker, you can easily add items to your invoice using an inbuilt barcode/QR code scanner. But it might also include charges for other items such as software or services like installation. It is important to detail each individual item and what it cost, as well as the total amount of payment due. If the customer orders multiple of the same item, you don’t need to list each one individually; you can abbreviate, for example, 10 laptops @ $500 per unit = $5,000. This is fine as long as it makes it clear to the customer exactly what they owe and what for.

This list covers the absolute basic amount of information which needs to be included on an invoice in the USA. Other countries have different laws about the requirements for invoices. For example, in the UK, if your business and your client are both registered for VAT, your invoice will also need to include the VAT amount. In Australia, invoices also need to provide the Australian Business Number (ABN) of your business, and the GST amount, if applicable. It is important to check what the law is regarding invoices in the country where your business is based.

The importance of a professional-looking invoice

Why you need professional invoices

Every document you send needs to reinforce the professional image of your business in the minds of your clients. This is especially the case with invoices, as they contain a lot of important information. All of this information needs to be presented in a way which is clear, concise, and as easy as possible for your clients to understand when reading it quickly. Remember, they are as busy as you are!

The quality of your invoices has a direct impact on the amount of repeat business you receive. If your invoices are tidy and professional-looking, and can easily be read and understood quickly, this demonstrates that you are a company which understands the needs of your clients. If it also includes your company branding, this is even better, as it reinforces the awareness of your brand for your clients and shows that you have taken the time to create professional-looking documentation so that you will be taken more seriously. This will make your clients more likely to want to work with you again in the future.

For maximum impact and ease of use, it is worth using an invoice template designed by a professional company which has your needs in mind. This way, you can easily make sure all the relevant information is included, and that it is presented in a clear, user-friendly way for maximum client appeal.

Identifying the ideal invoice template

A good invoice template will have several essential features which create the right impression for your business:

Firstly, the template needs to present all the relevant information in a clear and straightforward way which is easy to read. Your clients should not have to spend a lot of time trying to make sense of your invoices. This is also important for you, as time is precious when you are running a business, so you need a template which can be completed quickly and easily.

Secondly, you don’t want to be restricted to only doing business when you are in the office. This means you need an invoice template which enables you to create and send invoices on a variety of different devices, so the template should be downloadable in a number of the most popular formats, including PDF. In addition, a good invoice template will be backed up by high-quality software which makes life even more convenient for you by enabling you to create and send invoices from anywhere at any time.

Finally, your template for invoices should be easy to customise. It needs to be adaptable so that it can suit all the needs of your business and your different clients. It also needs to be able to include your company branding, as this instantly creates a more professional and memorable image.

Try the free invoice template from Billdu

Billdu is a solution that makes invoicing quick and easy for small to medium-sized businesses and sole traders. Designed with your specific needs in mind, it enables you to create and send a professional-looking invoice in seconds, with a simple invoice template that contains all the information you and your clients need. It is easy to customize so you can include the essential branding which sets your business apart from the rest, giving you a distinct advantage in today’s marketplace. It even automatically generates and sends recurring invoices for you.

This simple and effective template for invoices is backed up by an intuitive app that is available for iOS and Android, as well as an online-based software solution for PC. This means you don’t have to be in the office to create and send your invoices – you can do it from anywhere in the world. It also makes it easy for you to track invoices, and give your customers a simple, instant payment option by adding a Pay button.

You can download our sample invoice template for FREE by clicking on the button below.

Looking for Downloadable Invoice Templates?

We have them ready for you, select your format and get your invoice template now

When you are running a business, it is essential to have a grasp of the important metrics which are used to measure performance. These offer you the best way of analyzing the profitability of your business, enabling you to make sensible and informed decisions going forward.

EBIT and EBITDA are two of these metrics. But what do they mean? What is the difference between them? How are they calculated and what are the impacts they can have on your business?

We have put together this guide to EBIT and EBITDA, telling you everything you need to know and taking the confusion out of these metrics. This will enable you to put them to good use in running your business successfully.

What is EBIT?

EBIT stands for Earnings Before Interest and Taxes. It is the net income of your business before deductions for income tax and interest expenses have been made. It is sometimes referred to as your operating profit or operating earnings.

EBIT is an extremely useful metric for analyzing the true profitability of your business as it looks specifically at the earnings you generate from your operations. This gives you a clear picture of how efficiently your business is running and how wisely money is being spent as it only focuses on the costs which you can control. As tax and interest expenses are not within your control, including them can cause some confusion when it comes to working out the profitability of your business. In some respects, your EBIT is a more useful metric than your net income.

However, your EBIT is not a figure you need to include in your financial statements. Instead, it is a useful tool which shows you the financial health of your business, letting you know when you need to take corrective action.

How to calculate EBIT

Billdu Advice Calculating EBIT how to

[dt_gap height=”10″ /]

You can calculate EBIT for your business by using the following formula:

EBIT = net income + interest expense + tax expense

Calculating EBIT can be extremely useful as long as you know how to interpret the results and understand exactly what they mean.

If your EBIT is lower than your net income, this means your business is not generating enough profit. A healthy business should always have an EBIT which is at least equal to its net income, and preferably higher than it. A low EBIT is a clear warning that you need to do some corrective work.

So, what can you do if your EBIT is low? You have two options. The most obvious course of action is to reduce your spending. This could mean switching to cheaper suppliers, scaling back your marketing activities, or reducing your overheads in any number of ways. The second option is to find ways to increase your revenue. If you can achieve one or both of these objectives, your EBIT will rise, demonstrating that your business is becoming more profitable.

What is EBITDA?

EBITDA is another metric which is widely used to analyze the performance of your business and enable you to forecast how much your business has the potential to earn. It stands for Earnings Before Interest, Taxes, Depreciation and Amortization. This means it offers additional insights when compared to your net income or EBIT as it takes into account the effects of two extra variables:

  1. Depreciation – the amount by which the assets belonging to your business reduce in value over time.
  2. Amortization – the cost of repayments of debts, such as a fixed payment schedule on a business loan.

By accounting for these additional expenses as well as interest and taxes, calculating EBITDA can enable you to focus even more clearly on the actual profitability and performance of your business. It removes all the variables which are not directly related to your operations.

How to calculate EBITDA

There are two different ways of calculating EBIDTA for your business:

EBITDA = EBIT + depreciation + amortization

Or

EBITDA = net income + interest + taxes + depreciation + amortization

This metric is particularly useful for businesses that own a lot of assets or have debts as it enables you to make better projections and plan your future expenditures more wisely.

Advantages of EBITDA vs net income or EBIT

EBITDA vs net income

[dt_gap height=”15″ /]

EBITDA is widely used by both investors and business owners as it enables you to compare the profitability of different companies and even different industries. This is because it offers a means of assessing how different businesses manage their debts and the depreciation of their assets. This can be extremely useful for investors trying to choose the right business to invest in.

EBITDA can also be used by business owners to normalize business earnings. The business can appear as profitable as possible and future projections can be made more accurately. This can be extremely advantageous when you are trying to attract investment.

For example, you can normalize your EBITDA by including non-recurring expenses such as startup costs, repairs, and other one-time expenses such as a product launch. This paints the best possible financial picture of your business.

However, investors tend to be aware of the ways businesses can manipulate their EBITDA. It can make them suspicious that you could be making your business look more profitable than it really is. For this reason, an experienced investor will expect you to provide them with other metrics in addition to or instead of your EBITDA, such as your operating cash flow, which also includes working capital and the costs associated with it.

Some investors also prefer to use a metric that includes the costs of taxes and interest. This reassures them that your business is trustworthy and reliable, making all the required payments on its loans, and being run legally, fulfilling all its tax obligations.

In order to paint a complete picture of the financial health of a business, it is not unusual to use four or five different metrics, possibly more, depending on the nature of your business and how much information investors want to see. EBITDA is only one of these, and due to how easily it can be manipulated, it is not allowed in GAAP (Generally Accepted Accounting Principles) reporting for public companies. However, for small businesses, it can be a useful tool for analyzing the financial wellbeing and security of your business, as well as helping you to plan more effectively for the future.

How to calculate EBIT and EBITDA more easily using Billdu

When you need to calculate performance metrics such as EBIT or EBIDTA, it helps to have all the information you need in one place. Otherwise, you can spend a significant amount of time trying to find and analyze a huge number of different documents. This is not a situation you want to find yourself in if you have an important meeting coming up which could secure new investment for your business.

Billdu makes it much easier for you to calculate the performance metrics you need as it offers you an ideal starting point by calculating your net income for you. This is thanks to the powerful cloud-based system, which stores all your financial information securely in one place. Every time you make a purchase or receive a payment, this information is processed by the system and integrated into the cloud in the right order, so all the figures you need are at your fingertips whenever you need them.

Even better, Billdu enables you to calculate important performance metrics at any time and in any place. Its online software can be accessed from any PC but it also comes with sophisticated mobile apps for iOS and Android. This means you can produce the information you need even when you are away from the office – and even if you choose to change your smartphone, you can still continue to run your business seamlessly.

More and more small businesses are turning to Billdu to help make life easier and more streamlined. Billdu takes care of the mundane tasks involved in the day-to-day running of your business, freeing up more of your time so you can concentrate on making your business more profitable. It is also incredibly easy to customize to suit your individual needs.

If you would like to find out why our solution is so popular, you can experience it for yourself with a free trial.

Calculating EBIT and EBITDA in a breeze

Try Billdu today to start creating professional invoices and tracking your expenses online or via our mobile apps. Have balance instantly calculated and displayed on your Billdu Dashboard. Register for a free trial below now!.

Start for free

Looking for Downloadable Invoice Templates?

We have them ready for you, select your format and get your invoice template now


The app you choose to track your finances can have a huge impact on the smooth running of your business. But with so many different options now available, which is the best option if you are a small business owner looking to make your life easier and cut down on the time spent on some of your administrative and financial tasks?

We’ve taken a detailed look at one of the most popular solutions, FreshBooks, to see how it compares with Billdu and other leading invoice apps/software solutions so you can make an informed decision about which product is right for you.

What is FreshBooks?

FreshBooks is a software package aimed mainly at small businesses. It is a cloud-based solution so it can be accessed from any browser. It also comes with apps for iOS and Android so you can use it from your smartphone. Any actions you take on your phone are fully integrated with the system in the cloud.

The FreshBooks cloud accounting system is designed to make the financial and administrative aspects of running a business easier and more efficient, saving you time and automating some of the most mundane tasks you have to undertake on a regular basis.

The main features of FreshBooks include:

1. Invoicing

The Fresh Books software makes it easy to create a professional-looking invoice and customize it to reflect your brand. You can do this from anywhere with the mobile apps; you are not restricted to only sending invoices from the office.

FreshBooks can also automatically calculate the taxes on your invoice, enable you to send invoices in a wide variety of different currencies, and also track them so you can instantly see when they have been viewed and paid.

2. Expense tracking

The system enables you to see all your spending and profits at a glance without needing to go through individual receipts or spreadsheets. This is done via clever FreshBooks integrations with your bank account or credit card. It also contains a feature which enables you to take a photograph of a receipt on your phone and log it. The software will organize it into the system for you.

Your expenses are updated daily, making it easy for you to keep track of your spending on a specific project or for the whole of your business.

3. Time tracking

This is a useful feature as your time costs money. It is essential to know how much time you are spending on a particular project or client. You can start and stop the timer as required and it gives you a time log, which can then be put onto an invoice. This can be done from anywhere via the FreshBooks apps so if you are working away from the office, you can still track your time.

This timer is particularly useful because it is easy to create different categories and see at a glance how much time you are spending on each project.

4. Project management

Fresh Books makes collaboration easy as it offers centralized storage, making it quick and simple for all team members to find the documents they need and share their thoughts and activities with each other. Permissions can be set so that only those working on a project have access to it.

You can also include clients on projects, making it easier for them to give feedback at every stage of the process and ensuring everything stays on track.

5. Estimates

The FreshBooks software enables you to create and customize estimates and proposals quickly and easily, listing elements such as scope, timeline and cost. The client can approve this with a single click so work on the project can begin quickly.

Estimates can also be transformed into invoices almost instantly so you can get paid sooner. Like your invoices, your estimates can also be tracked so you can see when they have been viewed and accepted. They can be sent from anywhere via the FreshBooks apps.

6. Payments

FreshBooks payments offer your clients an easy way to pay invoices: by clicking a button on the invoice itself. The software automatically registers each payment as it comes into your account so your books are always balanced. You can also choose which account you want payments deposited into.

Offering your clients this level of convenience ensures you will get paid more quickly for the work you do.

7. Reports

Fresh Books also includes a number of tools to make reporting easier, offering you the insights you need into the progress of your business and helping you to keep your books balanced. It also enables you to share these reports with your accountant, making sure everything is exactly where you need it when it comes time to send in your tax returns.

How does FreshBooks compare to Billdu?

Billdu Professional invoice maker with android and ios apps

[dt_gap height=”10″ /]

Billdu is a new and highly streamlined system that offers essential ease and convenience to small businesses at highly affordable prices. Like FreshBooks, it is a cloud-based system that can be accessed from any PC, and it also comes with mobile apps for both Android and iOS.

Billdu’s main purpose is to make it easier to invoice your clients and track your expenses (for example, you can quickly add invoice items with the barcode scanner), which are the most essential things any small business needs. It has an extremely user-friendly interface, with a more modern design than FreshBooks. It is more intuitive on all devices. Customizing your invoices is easier with Billdu than it is with Fresh Books, giving you more options when it comes to design.

Billdu ultimately offers better value as it has all the same features as FreshBooks except for time tracking and reports. However, given the significantly lower cost and increased ease of use, Billdu is an ideal choice for many small businesses who can’t afford expensive solutions. It also gives you more control over which features you want to include as the three different plans available differ far more than those offered by the FreshBooks pricing model.

FreshBooks vs QuickBooks

QuickBooks Online accounting software

We have already done a comparison between Billdu and QuickBooks in a previous article so we thought a direct comparison of QuickBooks vs FreshBooks would be more useful here. Quick Books is the market leader and it is widely used by businesses in all industries worldwide. However, is it necessarily the best solution for your small business?

QuickBooks, like the other two systems, is cloud-based and comes with mobile apps for iOS and Android. However, if you want to customize your invoices, this can only be done from the software version, not from the mobile apps. FreshBooks and Billdu have the advantage here. In addition, while QuickBooks does offer a time tracking tool, it is not as sophisticated as the one offered by Fresh Books, which is unexpected from the market leader.

However, reporting in QuickBooks is far more advanced than it is in FreshBooks. QuickBooks offers a much more extensive range of reporting options, and the information is presented in a way which makes it much easier for you and your accountant to understand. It also features a chart of accounts, which is extremely useful if your business has more than one bank account and credit card.

If your business is expanding rapidly, QuickBooks also has the advantage here. It allows you unlimited clients, while in FreshBooks you are restricted to 500. This means the right system to choose will depend entirely on the needs of your business.

FreshBooks pricing vs Billdu and QuickBooks

You can’t get any version of FreshBooks free. Like Billdu and QuickBooks, FreshBooks pricing comes in three different levels to suit your needs. We have compared the monthly cost of all three so you can see exactly what you get for your money.

Billdu:

  1. Starter – $1.99
  2. Standard – $7.99
  3. Premium – $14,.99

The Starter package from Billdu is very basic, coming with just the invoicing and expense tracking features. However, the Standard package is extremely good as it comes with all but two of the features available in Premium. The main difference between the two is that the Premium package offers you larger numbers of users and invoices.

FreshBooks:

  1. Lite – $15
  2. Plus – $25
  3. Premium – $50

The Lite version of FreshBooks offers more features than the Billdu Starter package but at a vastly increased cost. In addition, if you want to add more users, you have to pay an extra $10 per person, even with the Premium package. As your team expands, this can end up costing you a lot.

QuickBooks:

  1. Simple Start – $15
  2. Essentials – $35
  3. Plus – $60

QuickBooks is the most expensive of the three systems, and it has a particularly complex pricing structure. It is difficult to see, even on their website, which features come as standard and which you have to pay extra for as you can pay for different combinations of features and numbers of users. This complicated structure is a disadvantage as small business owners want a quick and convenient solution that will not take too much time to set up.

The verdict

There is no ‘best’ app – choosing the right app for you will depend on what your business does, how many invoices you send, how many staff you have on your team, and a wide variety of other factors. It is important to do your research before making such an important purchase decision, and we hope this article has helped.

If you would like more information about Billdu and the many features it offers, please check out the Features page on our website.

Looking for an invoicing app, quote maker app & expense tracker similar to FreshBooks?

If you were thinking of FreshBooks, try Billdu today to start creating professional invoices and tracking your expenses via our user-friendly online dashboard and mobile apps. Register for a free trial now!.

Start for free

Looking for Downloadable Invoice Templates?

We have them ready for you, select your format and get your invoice template now


How healthy is your business? What does a healthy business even look like? These are questions which all small business owners need to ask themselves in order to remain competitive.

Profitability ratios are some of the most important metrics you can use to assess the health of your business in comparison to your competitors. Here we take an in-depth look at the various different types of profit ratio, what they mean, and how to calculate ratios in order to determine how profitable your business really is.

What are ratios of profitability?

A profitability ratio is a way of measuring how able your business is to generate earnings in relation to your expenses, assets and shareholder equity. If your profitability ratios are better than those of your competitors, or higher than they have been in previous comparable financial periods, this means that your business is healthy and likely to continue doing well.

There are various different types of profit ratio, and these metrics are used to determine how well a business is executing its operations and utilizing its assets in order to generate profits. Profitability ratios fall into two main categories:

  • Margin ratios – these show the ability of your business to translate the money you make from sales into profits.
  • Returns ratios – these demonstrate the efficiency of your business at generating returns for your stakeholders.

Both of these types of profit ratios are used to give insights into the overall financial health of your business.

Examples of margin ratios

1. Gross profit ratio

This compares your sales revenue to your overall gross profit. It demonstrates how much money your business is making once its operating costs have been taken into account.

If your gross profit ratio is high, this is a sign of a healthy business, as it shows that you can easily cover the costs of your operations while still generating a profit for the business. If your gross profit margin is low, this shows that there are areas where your business could be more efficient – perhaps your suppliers are charging you too much, or your marketing is not effective enough.

You can calculate this ratio by using the formula:

Gross profit ratio = gross profit / sales x 100

2. EBITDA margin ratio

This is the analysis of your business earnings before interest, tax, depreciation, and amortization are taken into account. It is often used to compare the profitability of your business to those of your competitors, as it excludes discretionary expenses.

While this profitability ratio does not give the most accurate picture of the performance of your business, it is a metric which is widely used in company valuations, so it is still an important figure to work out.

There are two ways of calculating your EBITDA margin ratio:

EBIDTA margin ratio = revenue – operating expenses

Or

EBIDTA margin ratio = net income + interest + taxes + depreciation + amortization

Calculating profitability ratios EBITDA

3. Operating profit margin ratio

This metric shows the earnings of your business as a percentage of your sales, before income tax and interest expenses have been deducted. A high operating profit margin shows that your business is being managed effectively, as the variable costs are being kept low. This enables you to offer lower prices than your competitors, increasing your market share.

The profitability ratio formula for working out your operating profit margin ratio is:

Operating profit margin = operating profit / total revenue

4. Cash flow margin ratio

This shows how efficient your business is at converting sales into cash. This is extremely important, because the more cash flow you have, the better equipped your business is to avoid unnecessary expenses such as late payment fees, as you will always have enough money available to pay your bills on time.

A high cash flow margin ratio also means you have more money at your disposal to purchase assets and facilitate the growth of your business. You can calculate your cash flow ratio using the formula:

Cash flow margin = cash flows from operating activities / net sales

5. Net profit ratio

In many ways, your net profit ratio is the most important profitability ratio of them all. Your net profitability ratio takes everything into account. All expenses, including taxes and interest payments, are included.

This means that the metric gives a clear picture of how profitable your business is in comparison to everything you have to spend out as part of your operations. You can work out your net profit ratio by using this formula:

Net profit ratio = net profit (after tax) / revenue

Examples of returns ratios

1. Return on assets

This shows your net earnings as a percentage in relation to the total assets of your business. It demonstrates how much profit your business generates, after tax, for every dollar’s worth of assets belonging to the business.

This has an impact on your operating costs, because if your profits are low in comparison to your assets, it shows that the cost of your assets is high. This means that it will cost you more money to create the infrastructure you need to become more profitable.

The formula for working out your return on assets is:

Return on assets = net profit / total assets

2. Return on equity

Billdu Profit ratios ROE Return on Equity

This shows how much net income is being generated in relation to the equity that investors have put into your business. If your return on equity ratio is high, this means your business is less likely to be reliant on debt financing, so investors are more likely to want to buy into your business. This has a direct impact on the price of shares in your business, as a high return on equity ratio correlates with a higher share price.

You can calculate this ratio by using the formula:

Return on equity = profit after tax / net worth

If you need to know how to work out the net worth of your business, the formula to use is:

Net worth = equity share capital + reserve + surplus

How you can use profit ratios to assess your business health

Individually, profitability ratios measure different aspects of the financial health of your business. Put together, they give you a clear picture of areas where your business is doing well financially and generating healthy profits, and areas where there might be room for improvement. This enables you as a business owner to take better decisions about the management of your business, and use the assets you have to maximize profits.

Many businesses consolidate all the results of their various profitability ratios into a Discounted Cash Flow model. This is a broader financial statement that looks at historical and current results in order to make predictions for the financial future of the business, and also includes a Net Present Value which shows you how much your business is worth at the current reporting time.

In addition, there are a number of other ratios you can use to inform the overall picture of the financial health of your business. These include:

1. Debt-equity ratio

This shows you the amounts of debt and equity your business relies on to finance its assets. If this ratio is too low, it illustrates that you are risking too much of your own business capital instead of taking advantage of opportunities to borrow. If it is too high, it demonstrates that your business relies too much on loans. Ideally, your debt-equity ratio should be around 2:1.

You can calculate this ratio using the formula:

Debt-equity ratio = total liabilities / shareholders’ equity

Profit ratios for business health check

2. Current ratio

This is a useful metric, as it shows you how capable your business is of paying back its immediate liabilities. Again, you should aim for a ratio of around 2:1, as this shows that you are in a good short-term position while still making the best use of your working capital.

The formula for calculating your current ratio is:

Current ratio = current assets / current liabilities

3. Stock turnover ratio

This metric only applies to companies which deal in goods rather than services. It demonstrates how effective your business is at turning your stock into profits. If the ratio is too high, it shows that your stock is not being sold quickly enough. If it is too low, this means you are probably struggling to meet customer demands.

You can calculate your stock turnover ratio using the formula:

Stock turnover ratio = cost per unit sold / average stock level

Assessed together, all of the profitability ratios we have discussed here give you an extremely accurate picture of the health of your business’ finances.

Make life easier with Billdu

If you would like to make it easier to stay on top of your business’ financial health, Billdu can help you. You can find out exactly what this clever software can do for your business by trying it out for yourself! Try our free invoice generator or click the button below to register for your FREE trial today.

Start for free

Looking for Downloadable Invoice Templates?

We have them ready for you, select your format and get your invoice template now

When you are running a small business, it is imperative that you can easily keep track of your finances to ensure that your business remains profitable and successful. This means that you need specialist software to make life easier and take some of the time and effort out of keeping your books balanced.

But which tool is right for your business? With so many options on the market, it can be difficult to make the right choice. Here we compare QuickBooks with our own Billdu invoice maker and expense tracker to help you make an informed purchase decision.

What is Billdu?

Billdu is a simple, user-friendly package specifically designed for small businesses, to help you prepare professional invoices and track expenses. Billdu is a cloud-based solution, and all information is stored on a secured server similar to those used by banks. This gives you absolute peace of mind that your financial data can only be accessed by those you have given permission to.

The whole point of Billdu is to simplify financial processes for small businesses, saving you up to 60 percent of the time it usually takes to stay on top of your finances. There are three different pricing plans to choose from, and all of these give you access to the online version and both mobile systems, for iOS and Android. This makes it easy to access your financial information on-the-go, and send invoices from wherever you are, enabling you to increase your business success by spending more time out of the office and concentrating on the areas of your business you excel at. The pricing plans are:

  • Starter – from $1.99 per month (30 invoices per year, one user)
  • Standard – from $7.99 per month (300 invoices per year, one user)
  • Premium – from $14.99 per month (unlimited invoices, 10 users)

Billdu also gives you access to a highly knowledgeable support team, who are always happy to help you out with any problems and answer any questions you may have. This support means that you can address any issues as they arise, giving you constant control over your business finances and setting you up for greater success.

Billdu Professional invoice maker with android and ios apps

[dt_gap height=”20″ /]

What features does Billdu offer?

Billdu offers a huge range of features, providing you with most of the solutions you need for the day-to-day financial management of your small business. The main features offered by Billdu include:

Invoicing

The invoicing features on Billdu are extremely similar to QuickBooks invoicing. You can easily create and send a professional invoice in seconds from your PC, tablet or smartphone, as well as being able to track when an invoice has been opened and even see who has read it. You can also attach images of your products to your invoices, making it easier for your customers to see at a glance what the invoice refers to.

In addition, you can add a Pay button to your invoices, to make it easier for customers to pay the invoice straight away if they choose to do so, for added convenience, a lot like QuickBooks credit card processing.

If you have recurring invoices, you can set the Billdu system to create and mail them automatically, saving you serious amounts of time.

Estimates

Billdu makes it easy to create and send professional estimates and quotes which are straightforward for the customer, making your business a more attractive option.

Purchasing and deliveries

With Billdu, you can easily keep track of the orders you have received, and offer your clients an easy purchasing process. You can also make deliveries easier by generating delivery notes directly from your invoices, and clients can sign for deliveries directly on a smartphone using their finger.

Inventory management

The Billdu system works in a very similar way to QuickBooks inventory management, making it easy to keep track of your stock, and you can quickly and simply add items to orders and invoices. You can use dynamic QR Code / barcodes to organize your inventory and add items to your invoices with Billdu’s built-in QR code/barcode scanner.

Expenses management

This gives you a convenient overview of your expenditures, and includes a receipt scanner (view the list of business expenses).

Exports

Billdu makes it easy for small businesses who export to other countries, as it enables you to generate invoices, estimates and orders in all the most popular formats. You can even send invoices in 16 different languages and their associated currencies, making overseas transactions easier than ever.

Sharing information

Billdu enables you to share information directly with your accountant and different members of your team, including setting permissions so each person is only able to see information appropriate to their role.

Billdu online invoice maker explore features

What is QuickBooks?

QuickBooks is the best-known software for small to medium-sized businesses. It was designed by the US-based software company Intuit, and has been widely available since 2000. It currently has 80 percent of the market share.

While QuickBooks is hugely popular and offers a vast range of features, its software can be confusing as it is available in an extensive range of versions. Some of these are cloud-based, while others are desktop solutions for Mac and PC. Mobile apps are also available. Within these categories there are various different options to choose from.

As the QuickBooks offering is so huge and varied, it can be difficult to select the best option for your business. Here we break it down by explaining a little about each of the main options available.

QuickBooks accounting software for SMB

QuickBooks Online Pricing

This is a cloud-based solution, and is the most popular of the QuickBooks versions for small businesses. There are three different QuickBooks Online pricing plans available:

  • Simple Start – $15 per month, one user
  • Essentials – $25 per month, three users
  • Plus – $35 per month, five users

The Plus version comes with a lot more features than the other two cheaper plans.

QuickBooks Online accounting software

Source: J2Store.org


[dt_gap height=”10″ /]

QuickBooks Desktop Pro 2019

QuickBooks Desktop is designed for desktop users, so it is not a cloud-based platform. It comes in several different versions:

  1. QuickBooks for Mac – this uses the Apple OS operating system, so it is only suitable for Mac computers. There is only one version available and it cannot be scaled up.
  2. QuickBooks Pro – this is a simple package for Windows, ideally suited to small businesses just starting out. QuickBooks Pro 2019 does not come with many features, but it can easily be scaled up to either of the other Windows versions for an extra cost.
  3. QuickBooks Premier – again for Windows, this is more advanced than QuickBooks Pro, as it can be tailored to suit the specific needs of your industry. It can easily be scaled up to Enterprise if the needs of your business change and grow.
  4. QuickBooks Enterprise – this is a highly flexible accounting and business management solution for small to medium-sized businesses. It is only available for Windows, and is the most advanced and expensive of the desktop versions. There are three levels to QuickBooks Enterprise: silver, gold and platinum. Each of these offers different features and options, but the platinum package, which offers the most features, costs a considerable amount of money.

QuickBooks online vs desktop: which is the better option?

This really depends on the individual needs of your business. However, QuickBooks Online is the more popular solution, as it offers greater flexibility. A cloud-based solution can be used on-the-go from your smartphone or tablet, and the online version also offers a wider range of features at a more reasonable price. You can use the qbonline login to sign to your Intuit account to access all Intuit products including QuickBooks. There is a possibility to login using your user ID and password or sign in with Google.

Some of the features which are free with QuickBooks Online (qbonline) come at an extra cost on the desktop versions, such as automatic downloads of your bank and credit card transactions, and online customer payments.

What features does QuickBooks offer that Billdu doesn’t?

Most of the features offered by QuickBooks Online are also offered by Billdu. However, there are a small number of features which Billdu does not yet offer, which you can find on QuickBooks:

  1. Track miles using your smartphone so you can reduce your tax bill;
  2. Automatically categorize transactions into the relevant tax areas;
  3. Calculate wages for up to ten employees directly from the system, including automatic tax calculations for each worker;
  4. Track income and expenses on each individual project.

However, not all of these features are available with every version of QuickBooks.

Which is the better system, Billdu or QuickBooks?

This depends entirely on what you are looking for and the nature of your business. If you want a solution which does everything, and your business is expanding extremely rapidly, you should probably download QuickBooks, as it offers more features and is more scalable due to the vast number of different versions available.

However, if you are looking for an easy-to-use, cost effective solution which takes care of the vast majority of your financial management, Billdu is the way to go.

If you would like to find out more about Billdu and the many different features it offers, please click the button below to register for your FREE trial. You will be amazed how much easier Billdu can make life for you and your small business.

Create invoices, track expenses and inventory with Billdu

Try Billdu today to see how you like our simple user interface. We have online dashboard and mobile apps for you to use. See how we compare to QuickBooks for yourself! You can register for a free trial below.

Start for free

Looking for Downloadable Invoice Templates?

We have them ready for you, select your format and get your invoice template now

We use cookies to make your experience better, to improve our services, and for advertising. By continuing to browse our site, you agree to accept our cookie policy

Continue